Mail Setup with Mozilla Thunderbird
Once you have enabled two-factor authentication, external applications such as Outlook, Thunderbird, DAVx⁵, or mobile calendar and contact apps can no longer access mailbox using your regular password.
To do so, you need to create an application password. Without enabled two-factor authentication (2FA), the use of application passwords is optional.
Our servers are configured so that Mozilla Thunderbird can automatically detect the necessary settings based on your mailbox mail address.
Click on the link to create a new mail account on the Thunderbird start screen to set up your mailbox address:
Set Up mail Account in Mozilla Thunderbird
Follow this step-by-step guide to set up your mail account in Thunderbird:

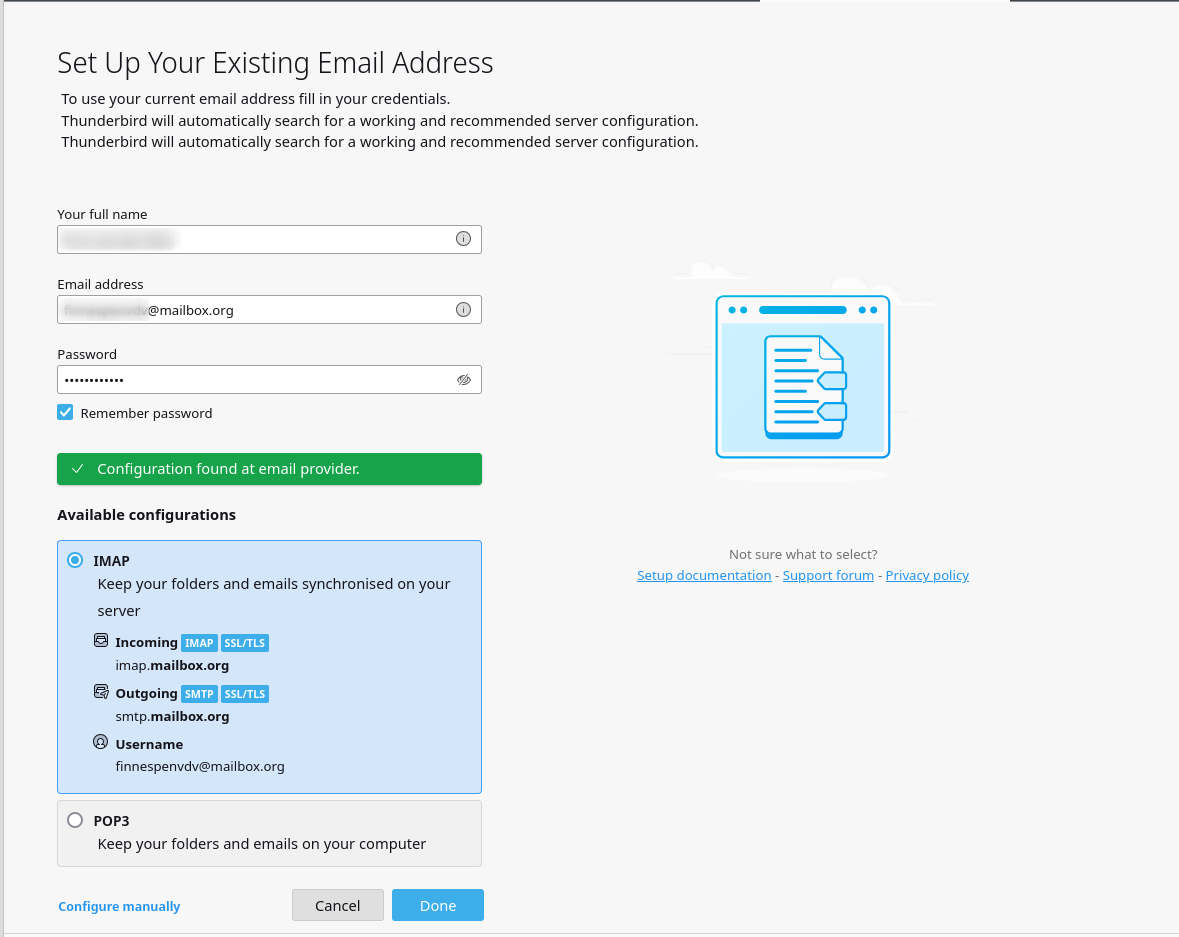
Figure 1: Setting up an email address in Mozilla Thunderbird.
Step 1: Launch Thunderbird and Start Account Setup
- Open Mozilla Thunderbird.
- On the start screen, click “Create a new email account”.
You can also perform this step directly via Thunderbird’s application menu (three-line/hamburger menu). The wording may vary slightly depending on the Thunderbird version.
Step 2: Confirm Welcome Dialog (if displayed)
If a welcome dialog appears when opening Thunderbird for the first time, choose the option Skip this and use my existing email address.
Step 3: Enter Account Information
In the next dialog window, enter the following information:
- Your name: The name that will appear as the sender
- Email address: Your mailbox address
- Password: Your mailbox password
Step 4: Automatically Detect Server Settings
- Click “Continue”.
- Thunderbird will now automatically detect the server settings.
- You can choose between the protocols IMAP (recommended) and POP3.
Step 5: Finish Setup
Click “Done”. Thunderbird will verify your information and complete the setup.
Use Email Aliases in Thunderbird
If you use multiple email aliases with mailbox, you can add them as additional identities in Thunderbird.
Step 6: Add Alias
- In Thunderbird, go to:
Menu → Account Settings → [Your main account] - At the bottom right, click on “Manage Identities…”.
Step 7: Enter Alias Identity
- A window with a list of identities will open.
- Click “Add…” and enter the alias address and desired name.
Step 8: Use Alias When Composing Emails
When composing a message, you can now choose the desired alias from a dropdown menu in the sender field.
Done! You’ve successfully set up your mailbox account in Thunderbird and can now flexibly use email aliases.
Helpful additional information
In newer versions of Thunderbird, the setup dialog has been expanded. When adding your mailbox account, you can now not only set up the e-mail account, but also automatically connect all associated address books, calendars, and tasks.
After entering your login credentials, an additional selection screen appears where you can choose whether Thunderbird should automatically configure CardDAV address books, CalDAV calendars, and task lists.
Enable the desired options – the required connections will then be set up automatically, without the need to manually enter any CalDAV or CardDAV URLs.
