Move away from Gmail to mailbox.org - step-by-step
Would you like to move your entire data and e-mails away from Google to mailbox.org?
In this article, we will explain how to do this comprehensively in seven steps:
Overview:
-
Export your Gmail data.
-
Create an e-mail forwarding rule for your Gmail inbox to relay all messages to mailbox.org automatically. Optionally, also create an auto-responder message to inform senders of your new mailbox.org address.
-
Import your data to mailbox.org.
-
Inform your friends and associates about your new e-mail address.
-
Respond to forwarded e-mails from your Gmail account with your new mailbox.org address.
-
Systematically remove your Gmail address from online services and replace it with your mailbox.org address or special aliases.
-
After a while, ask Google to delete all your data in accordance with European general data protection regulations (GDPR/DSGVO).
-
Heads-up for those who use Google 2-Step-Verification.
Export your Gmail data
Calendar
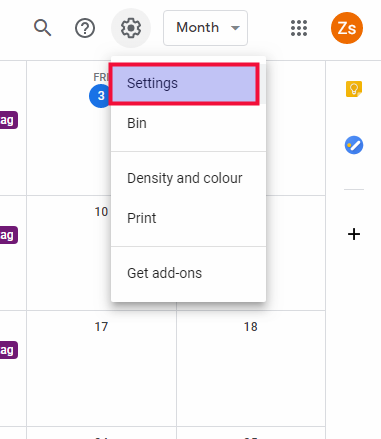
Log in to Gmail and click on the Calendar app. Then, click on the cogwheel symbol and select "Settings".
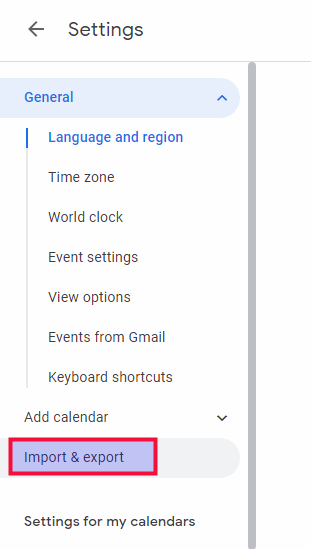
Next, in the lower left area, click on "Import & export".
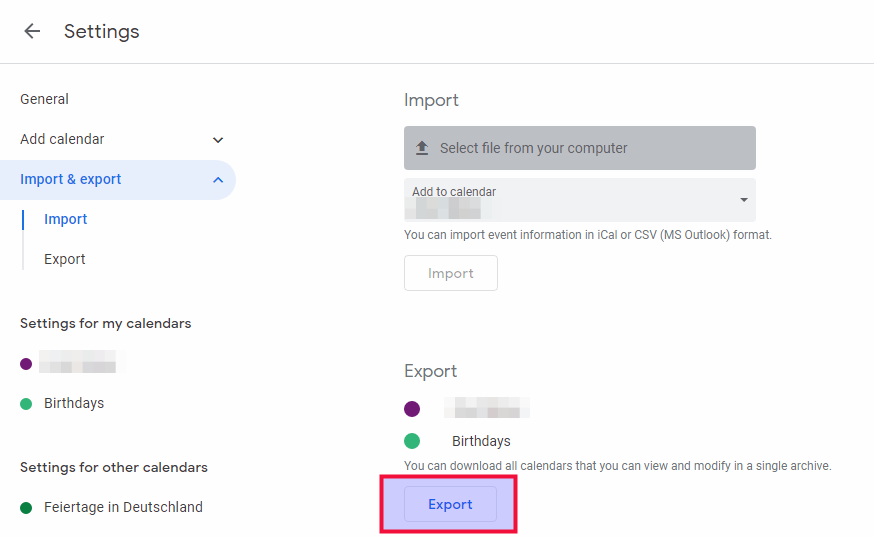
Now, click on the button "Export", which can be found at the bottom of the content page.
Your browser will now offer the option to download the file. Confirm the download. After the download is complete, you will find the file in your downloads folder.
Contacts
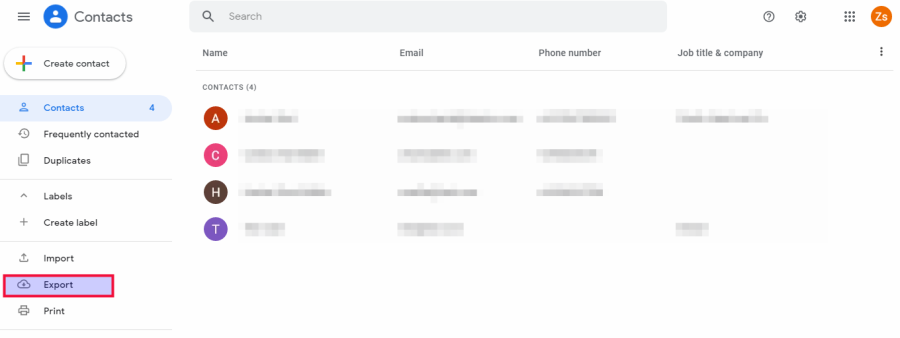
Log in to Gmail and click on the Contacts app. Further down on the page, click on "Export".
Select (all) "Contacts".
Under the section "Export as" please select "vCard (for iOS Contacts)".
Then, click on "Export".
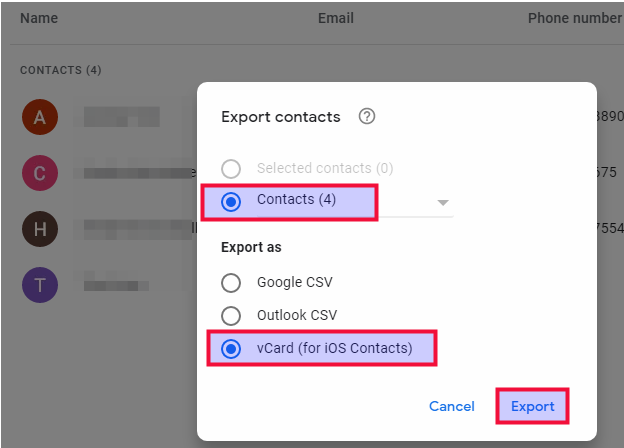
Your browser will now offer the option to download the file. Confirm the download. After the download is complete, you will find the file in your downloads folder.
2. Create an e-mail forwarding rule in Gmail to relay all messages to mailbox.org automatically
Log in to Gmail and click on the cogwheel symbol on the right-hand side of the page. Select "Settings" and then click on the tab "Forwarding & POP/IMAP"

You will now see a button that says "Add a forwarding address". Click on it, and then enter your mailbox.org e-mail address in the corresponding field.
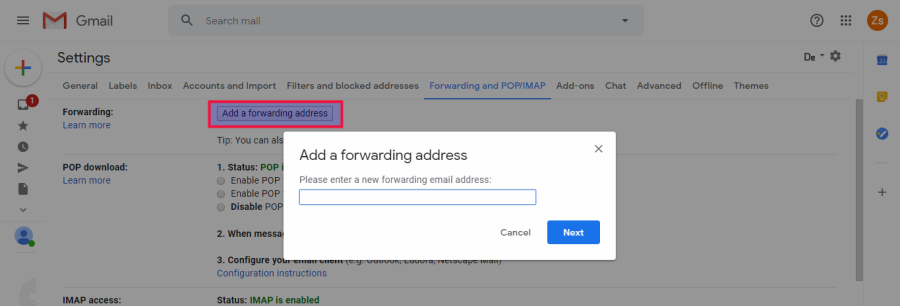
Another pop-up window will appear, asking you to confirm the forwarding address. Please check if your e-mail address is correct and then click "Proceed".
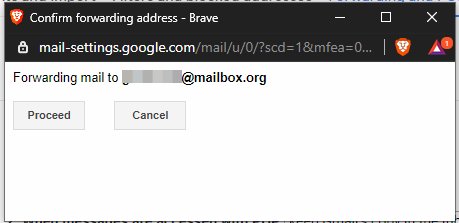
In the next step, you need to confirm the process from the mailbox.org end. Log in to mailbox.org, find the confirmation e-mail that was sent by Google and click on the link in that e-mail. A website will open that asks you to click on a "Confirm" button.

Finally, the forwarding rule needs to be enabled in Gmail. Under "Forwarding", select the option "Forward a copy of incoming mail to your address and delete Gmail's copy"

Don't forget to click the button "Save Changes" at the bottom of the page to apply the changes.
Create an Out of Office message.
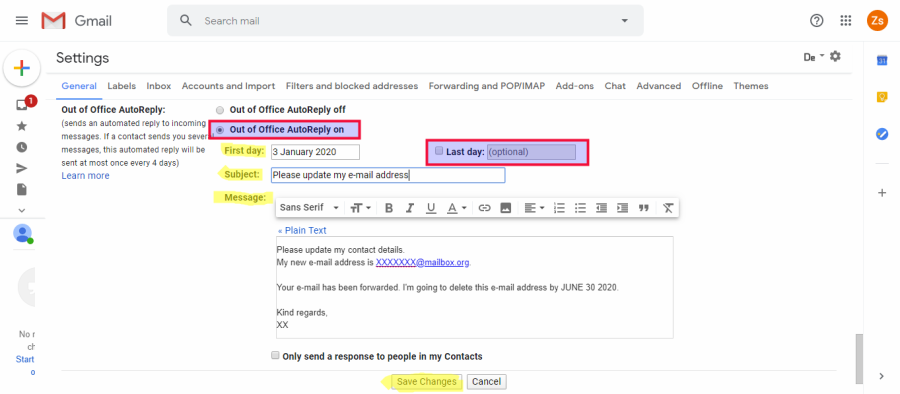
Once again, click on the cogwheel symbol on the right-hand side of the page and select "Settings". On the "General" tab, scroll down to the bottom until you see the option "Vacation responder" or alternatively, "Out of Office AutoReply".

Create the message as shown in the screenshot below. Then, click on "Save Changes" at the bottom.
Tip for advanced users: The security expert Mike Kuketz describes in this article (in German) how to set up an auto-reply specifically for Gmail senders : https://www.kuketz-blog.de/mailbox-org-gmail-auto-responder/
Mike uses a script to warn those senders about using Gmail and to inform them that he might not respond to e-mails sent through Google.
3. Import your data to mailbox.org
Import your e-mails
The importing of e-mails can be done easily using an e-mail client. Many of our customers use Mozilla Thunderbird, which is available for all common platforms and can be downloaded here: https://www.thunderbird.net
Install this or any other e-mail client of your choice and set up your mailbox.org e-mail account with that client. You can find instructions on how to do this here: [https://kb.mailbox.org/en/business/e-mail-article/setup-with-mozilla-thunderbird)
In the next step, do the same with your Gmail account. After the configuration is complete, you may need to log in to Google again to authorize Thunderbird to access your e-mails.
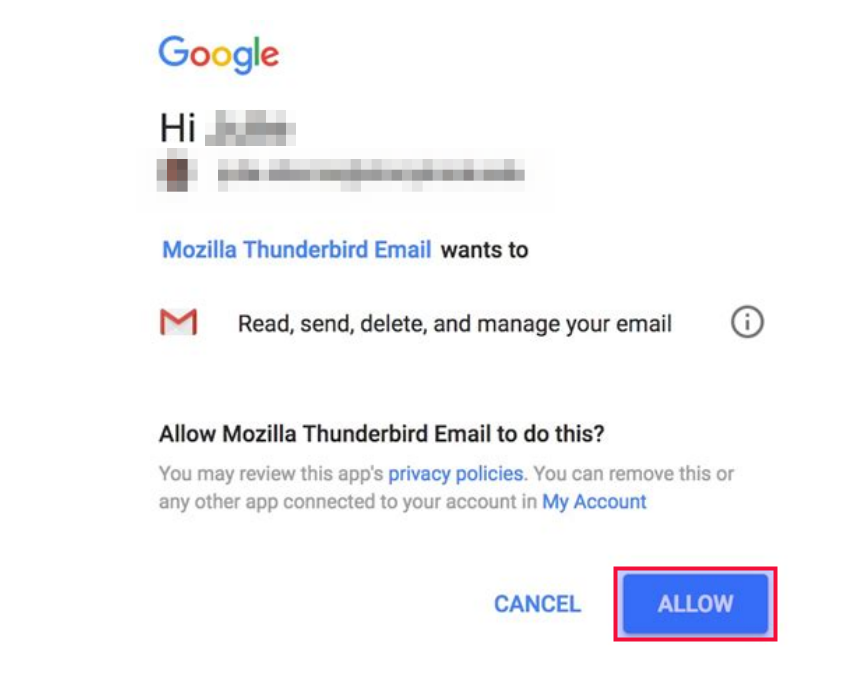
Please do make sure your Gmail account uses IMAP. Go to the section "IMAP access" under "Forwarding and POP/IMAP) as shown in the screenshot below to double-check.

Back in your e-mail client, select no more than 300-500 e-mails from your Gmail account in one go and click the RIGHT mouse button to open the context menu. Then, select "copy to" (or similar) and choose the path to your mailbox.org account and the corresponding folder (e.g., "Inbox" or "Sent items").
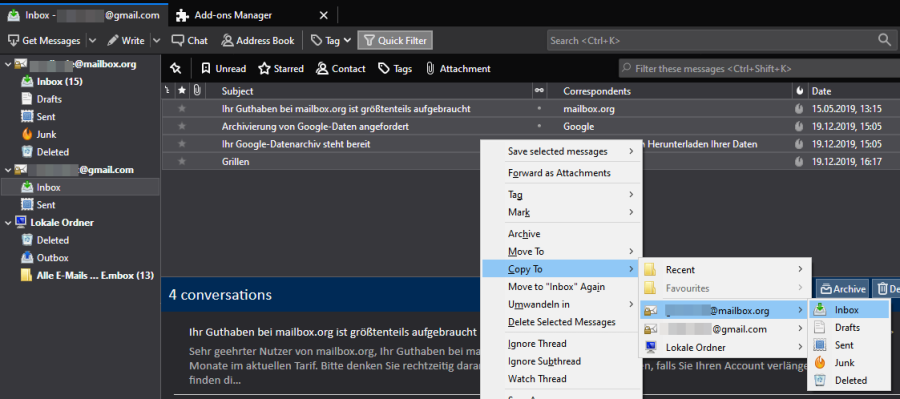
In this fashion, copy over batches of e-mails until copies of all relevant e-mails from the various folders of your Gmail inbox sit in your mailbox.org account.
Import your calendar and contacts
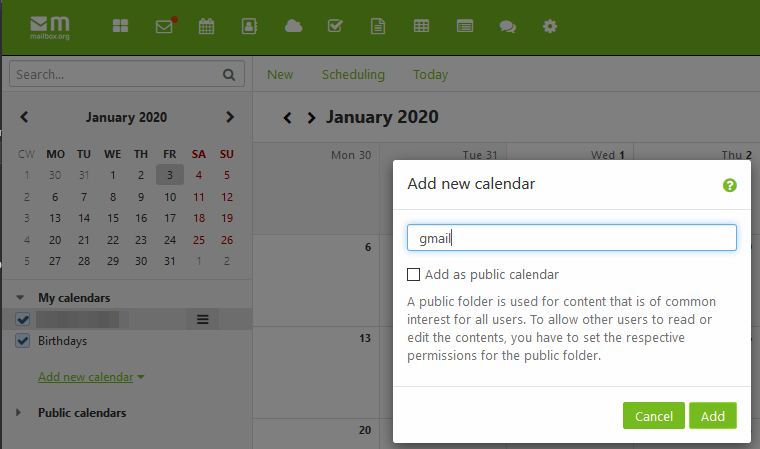
The easiest way to do this is with our online office. Log in to mailbox.org, open the calendar view, and create a new calendar as shown in the screenshot below. Note that this additional calendar can always be deleted in case something goes wrong (which you cannot do with the main calendar).
After creating the new calendar for importing, click on the hamburger menu ( ☰ ) and select "Import".
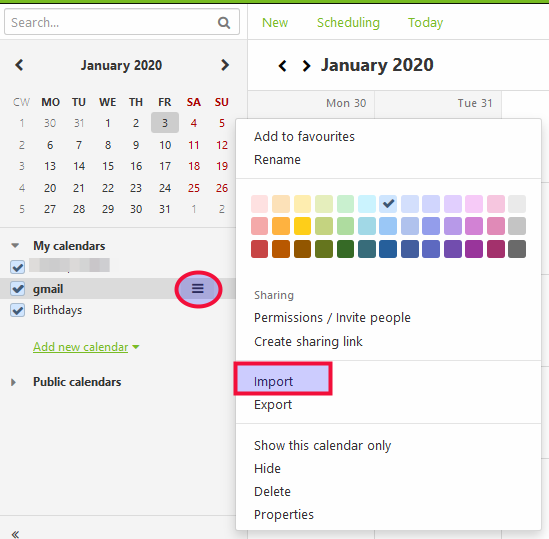
Now provide the path to where you saved the Gmail calendar file. Click "Open". It is recommended to tick the box that says "Ignore existing appointments" before importing. If you are unsure, try without ticking the checkbox first to see how it works out. Should you end up having to deal with many duplicate appointments as a result, simply delete the calendar, create anew, and repeat (with the checkbox ticked).
Click on "Import".
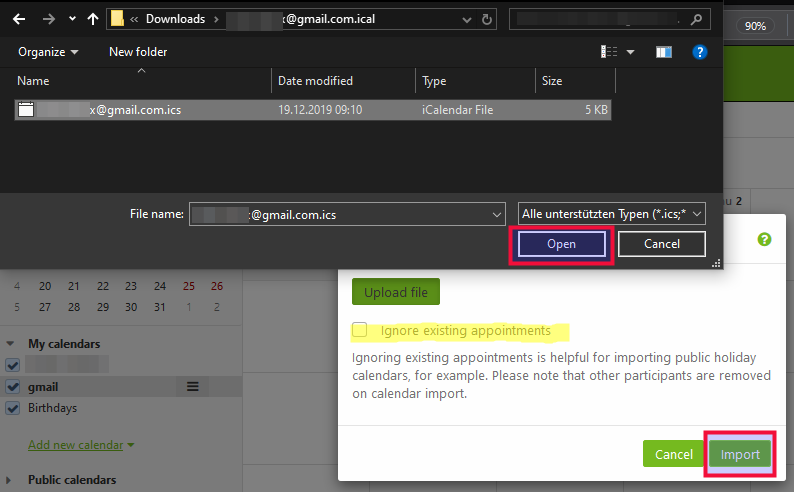
Your calendar has now been imported. You can show or hide your calendar contents in the overview page by ticking the checkbox next to the calendar name on the left-hand side.
Please note that the birthday calendar is a "virtual" calendar that is automatically created on the basis of your contact data. To make changes to this calendar, you need to edit the relevant information in the contacts.
Now change into the address book view and create a new address book as shown in the screenshot below. Similar to the calendar import, you can delete this new address book and create a new one should anything not work as intended. Similar to the calendars, you can't delete the main address book.
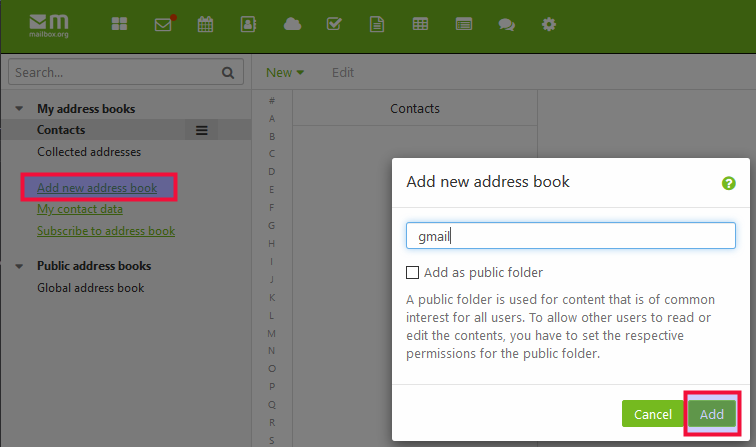
After creating the new address book for importing, click on the hamburger menu ( ☰ ) and select "Import".
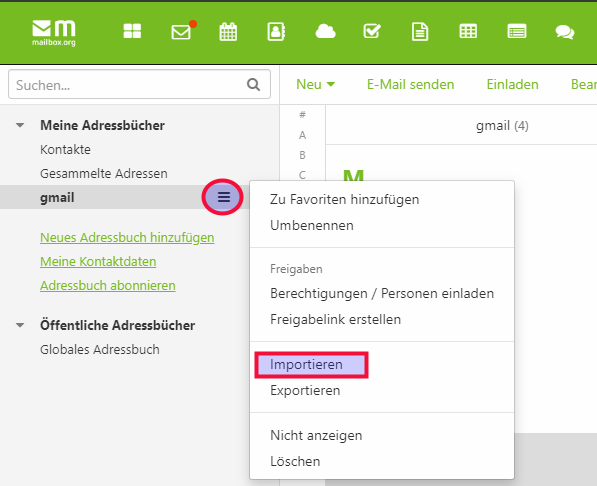
Make sure that the format "vCard" has been selected in the next step.
Now provide the path to where you saved the Gmail address book file. Click "Open", then "Upload file", and finally, "Import".

Once again, if you make a mistake or something doesn't go as intended, simply delete the calendar, create it anew, and repeat the steps.
After importing both contacts and calendars, have a quick look through the imported data to check if everything is there. Normally, the data import is a surefire process but nevertheless, you can have peace of mind because the original data is still in your Google account should you need to fix any issues.
4. Inform your friends and associates about your new e-mail address
Draft a an e-mail message to this effect, to be sent from your mailbox.org account.
Select all relevant recipients and make sure to put their e-mail addresses in the BCC field to maintain the privacy of your contacts. If possible, send the e-mail to no more than 50 to 80 recipients at a time and repeat until you have informed all your contacts.
In the message, ask your contacts to no longer use your Gmail address and to remove it from their address books.
5. Respond to forwarded e-mails from your Gmail account with your new mailbox.org address
Make sure that the e-mail clients, calendars and contact lists on all other devices you use are also reconfigured to use only mailbox.org instead of Gmail (Smartphones, tablets, etc.).
Being systematic and consistent in implementing these changes will ensure that the old e-mail address "wears out" over time until it is no longer used by anyone. It helps when people look up your name in their address books, that they will only see your new e-mail address.
6. Systematically remove your Gmail address from online services and replace it with a different address or special aliases
Many websites that offer user accounts usually require an e-mail address to be associated with that account. This is useful to receive information or maintain those accounts and access certain features, such as a password reset. In order to reduce and remove your dependency on the Gmail address, replace it with your mailbox.org address on all websites where it is currently set up as the main correspondence address (e.g., online shops, social medial, discussion forums, etc.). Also, mailbox.org makes it really easy to use address aliases with the same inbox and many of our customers use different e-mail aliases for website accounts, which makes it harder for web companies to create comprehensive user profiles of their customers to exploit for marketing and sales.
See here for more information:
https://kb.mailbox.org/en/business/account-article/what-is-an-alias-and-how-do-i-use-it
7. After a while, ask Google to delete all your data in accordance with European general data protection regulations (GDPR/DSGVO).
You should allow a bit of time for the transition from Gmail to mailbox.org. Once you are confident everything works fine, you can ask Google to delete all data they have stored about you. Click on the following link to start this process: https://security.google.com/settings/security/deleteaccount
Please make sure to read carefully the information provided by Google about the deletion process.
8. Heads-up for those who use Google 2-Step-Verification.
If you use this functionality, you should set up a set up an app password.
You can do so by clicking on "Google Account", then "Security" on the left. On the right click on "App Passwords".
The name for the platform may be chosen freely. The type of service would be "e-mail".
Have fun with mailbox.org!