Using e-mails with a custom domain
You can also use our servers to send and receive mail addresses with aliases of your own domain (for example: bernd.mustermann@example.com).
This feature is available in the Premium and Standard plans, as well as in the Light plan when using a Family Account. After successful configuration, you can also define such an alias as your primary address.
Information for Business Account Customers
This guide is intended for our private customers. If you are using a Business Account, please follow the instructions provided in this article.
Preparations
To use mail addresses with an alias of your own domain, you will need the following:
- A domain that you have registered with a provider of your choice. In this article, we will use the domain
example.comas an example. - The login credentials for the management interface of your domain, provided by your provider or hosting service. Common providers include Hetzner, Netcup, or INWX.
For administrators of a family account, there are two options for integrating the domain:
- All family members can use the external domain.
- Only the administrator of the family account can use the external domain.
Note on Data Processing and Storage
Mail from domains that are forwarded and sent via mailbox is processed and stored on our servers.
Step 1: Retrieve the mailbox Security Key
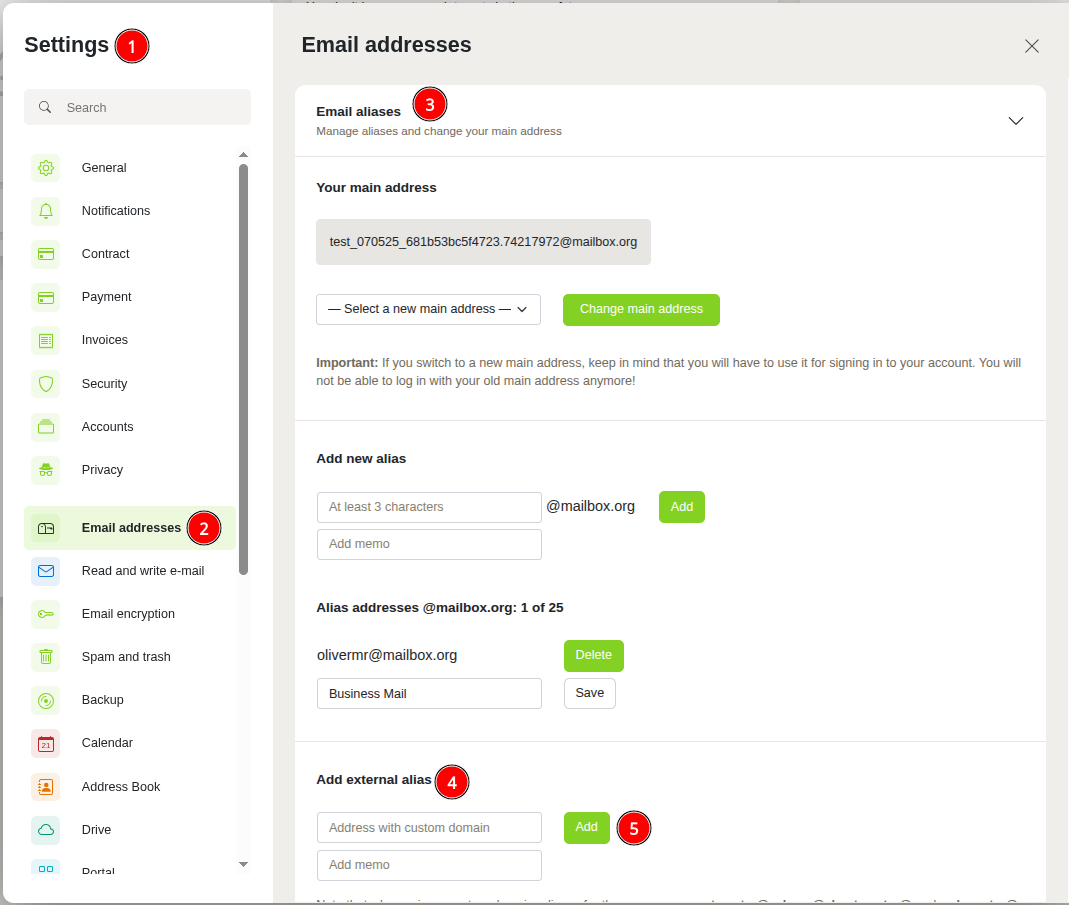
- Open the Settings in the mailbox user interface.
- Click on the menu item E-Mail-Addresses.
- Select the submenu E-Mail Aliases.
- In the input field Add external alias, enter the desired mail address using your own domain (e.g.,
bernd.mustermann@example.com). - Click Save.

Figure 1: Add external Alias.
In the background, mailbox now checks whether the security key is already stored in the DNS records of your domain.
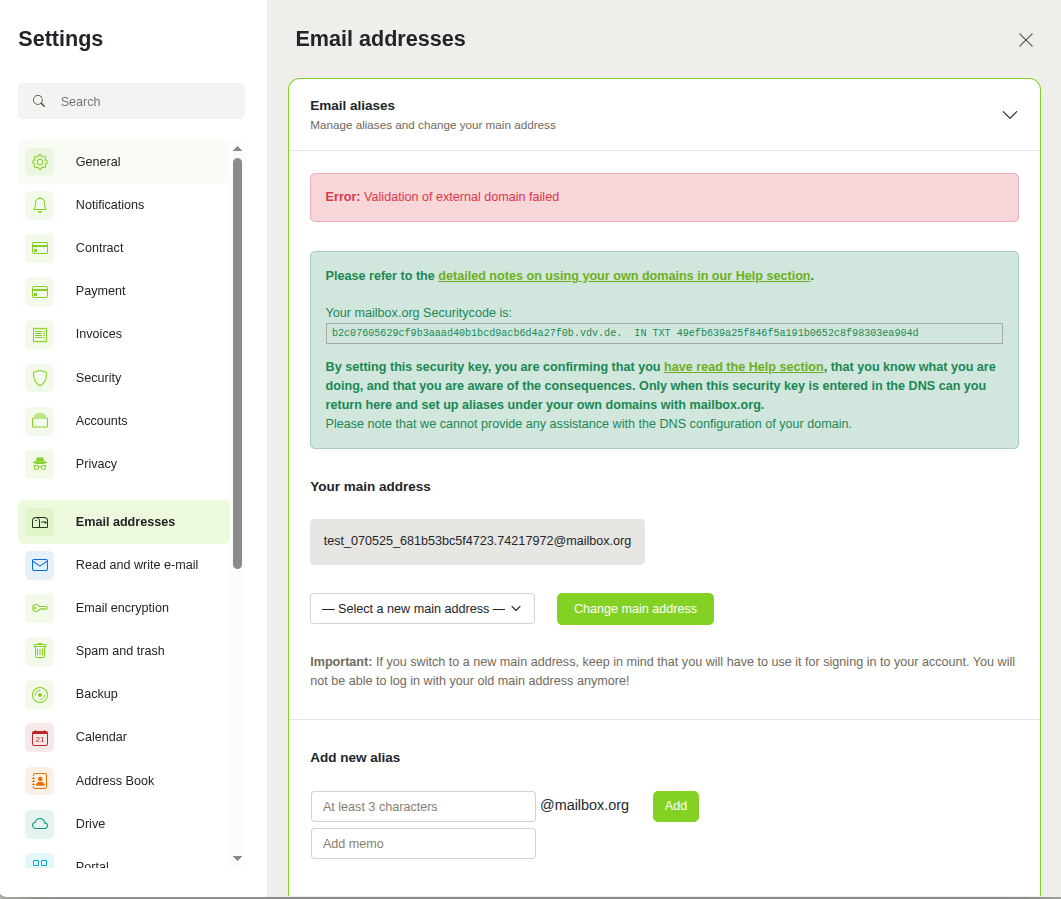
If you are adding the alias for the first time, you will see the message Error: Validation of the external domain failed, and new security keys will be generated for the domain.
Security Keys for Individual mailbox Accounts
If you are using your mailbox account as an individual (not a family account), the following will be displayed (Figure 2):

Figure 2: Validating an external Alias.
Using your own domain in a Family Account
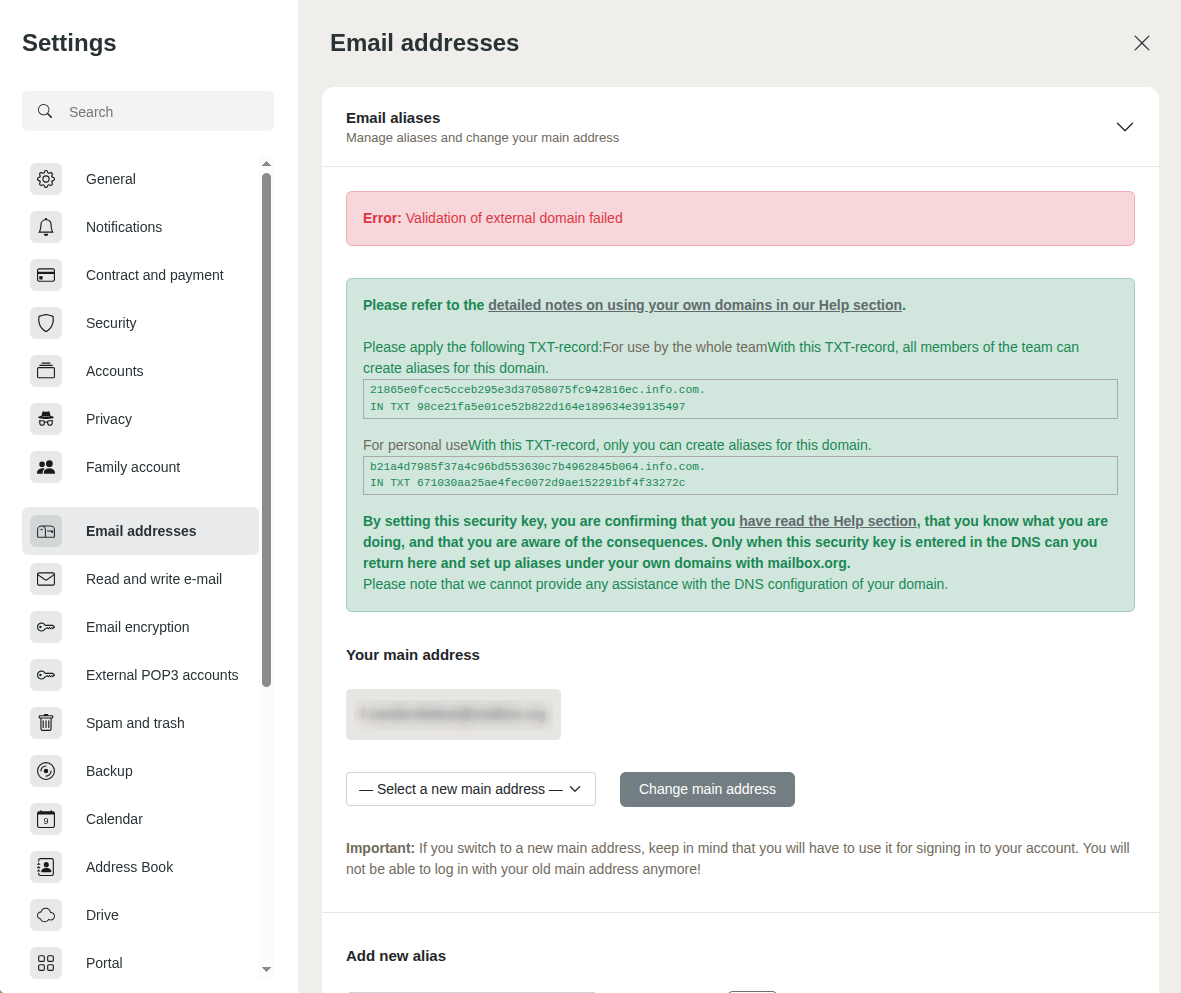
If you have a Family Account, there are two ways to add your domain:
-
Make the domain available to the entire family:
Use the upper TXT record. This allows all members of your Family Account to create aliases for this domain. -
Make the domain available only for yourself:
Use the lower TXT record. In this case, only you as the administrator of the Family Account can create aliases for this domain.

Figure 3: Validating an external Alias with family accounts.
Differences Depending on the Provider
Since each provider uses different web applications to manage domains and DNS records, the required formats may vary. mailbox therefore only provides general recommendations.
If you are unsure, please contact your provider’s support team and refer them to this guide. Typically, when you register your domain, you will receive login credentials that allow you to access the provider’s administration interface and make the necessary configurations.
Step 2: Add the mailbox key to your domain provider's DNS settings
The configuration may vary depending on the provider, but the basic steps remain the same:
- Log in to your domain provider and access the administration interface.
- Navigate to the DNS settings and add a new DNS TXT record.
- Depending on your specific scenario, enter the following keys:
DNS settings for individual mailbox accounts
- Add a "Hostname" entry containing the first part of the key (6) (see Figure 2).
- Create a "Target" entry and insert the second part of the key (7) (see Figure 2).
- Save the changes and wait for them to take effect.
DNS settings for mailbox family accounts (activating the domain for the entire family)
- Add a "Hostname" entry containing the first part of the key (8) (see Figure 3).
- Create a "Target" entry and insert the second part of the key (9) for the administrator (see Figure 3).
- Save the changes and wait for them to take effect.
After a short technical waiting period, you will be able to create additional aliases for this domain. No further DNS configuration will be necessary.
Copy Carefully
When copying cryptographic keys or their components, make sure that no characters are lost or altered. Ensure that you copy the entire key correctly and that no changes occur through the clipboard.
Notation in the Domain Name System
Depending on the provider, different notations may be used for DNS entries. Please refer to your provider’s documentation or support to learn which format is required. Common notations include:
p30oe995fc9105322345b6277ac3b1i2eb45106j5j7.example.com.(with trailing dot)p30oe995fc9105322345b6277ac3b1i2eb45106j5j7.example.com(without trailing dot)p30oe995fc9105322345b6277ac3b1i2eb45106j5j7(only the first part without dot and domain)
Waiting Time – DNS Updates
The worldwide synchronization of the DNS entry can take up to 24 hours. Only after mailbox can retrieve the change can you add the new mail address as an alias. This waiting time is technically necessary and cannot be accelerated.
Further tools to check the progress can be found under "Troubleshooting" later in this article.
Step 3: Add the mailbox MX Records in the DNS Settings of Your Domain Provider
Now you need to add an entry in the Domain Name System that ensures mails sent to your domain alias are routed to the mailbox servers. Another DNS entry, the so-called MX record, is required for this. You can also adjust this in the DNS settings of your provider.
You can find the necessary data for this in the mailbox settings. Simply open the menu from Step 1 of this guide again to retrieve the data (see Figure 1).
Note: If the configuration of the DNS entries was successful, you will now see the following message there.
MX records for using your own domain with mailbox
To use your domain correctly with mailbox, you need to configure the following MX records in the DNS settings of your domain provider.
| Domain | Type | Priority | Target |
|---|---|---|---|
| your-domain.com | MX | 10 | mxext1.mailbox.org. |
| your-domain.com | MX | 10 | mxext2.mailbox.org. |
| your-domain.com | MX | 20 | mxext3.mailbox.org. |
Note:
- Always enter all three records.
- The priority determines the order: Mail servers with
10are used first,20acts as fallback. - This ensures that your emails are reliably delivered via mailbox – even if one server should fail.
The three lines above contain all the information you need for the configuration at your provider:
- the name of your domain
- the forwarding priority
- the forwarding target, i.e. the mailbox mail servers responsible for handling your email
As you can see, three different mail servers are defined at mailbox. If one of them fails, the others will automatically take over – ensuring that our services remain available to you at all times.
Mail Server Priorities in DNS
For this to work reliably, mxext3.mailbox.org. must have a lower priority than the other two entries. Therefore, you will find the value "20" (13) in this line, while the other servers have the value "10".
How to configure the MX records
-
Log in again to the administration interface of your domain provider and navigate to the settings for the Domain Name System (DNS).
-
Add an "MX record":
- Enter your domain name under "Host" or "Hostname" (12), for example,
example.com.. - Please note the information about notation in the info box "Notation in the Domain Name System" further up on this page.
- Enter your domain name under "Host" or "Hostname" (12), for example,
-
Enter the "Priority" or "IN MX" value (13).
-
Enter our incoming mail servers as the "Destination" or "Points to..." value (14).
Again, follow the notation required by your provider. -
Save the record.
Repeat these steps for all three entries (see Figure 4)
Make sure that:
- Your domain (12) is entered identically in all three lines in the left column.
- The entry
mxext3.mailbox.org.has the priority 20 (middle column, third row) – (13). - All MX records that do not point to the mailbox servers have been removed.
- The notations meet your provider's requirements.
- The changes have been saved.
From now on, you can also send emails from your own domain via mailbox.
The correct order
The order of these steps is very important:
- First, create the required aliases in mailbox.
- Then, change the MX records at your domain provider.
Important: As soon as your MX records point to our servers, mailbox will receive all emails for your domain.
If the respective target addresses are not set up as aliases with us, these emails will be automatically rejected as undeliverable ("User unknown").
If you have already used the email addresses before, please check your old mail inbox, as emails may still arrive there until the DNS synchronization is successfully completed.
Only after a few hours – in some cases up to 24 hours – will it be known worldwide that mailbox is now responsible for your email addresses.
Step 4: Optimize Spam Reputation in DNS
To ensure that as few of your sent emails as possible end up in your recipients' spam filters, you should also apply the following settings.
The table contains examples of DNS records that you need to configure with your provider to properly set up SPF, DKIM, and DMARC.
Replace example.com with your domain and postmaster@example.com with your own email address.
Detailed DNS Configuration
You can find more details about the necessary settings in the article
SPF, DKIM, and DMARC: Improve Spam Reputation and Avoid Bounces
DNS Records for Your Domain
| Hostname | Record Type | Target | Protocol |
|---|---|---|---|
| @ | TXT | v=spf1 include:mailbox.org ~all | SPF |
| MBO0001._domainkey.example.com | CNAME | MBO0001._domainkey.mailbox.org. | DKIM |
| MBO0002._domainkey.example.com | CNAME | MBO0002._domainkey.mailbox.org. | DKIM |
| MBO0003._domainkey.example.com | CNAME | MBO0003._domainkey.mailbox.org. | DKIM |
| MBO0004._domainkey.example.com | CNAME | MBO0004._domainkey.mailbox.org. | DKIM |
| _dmarc.example.com | TXT | v=DMARC1; p=none; rua=mailto:postmaster@example.com | DMARC |
Special Cases
-
If you own multiple mailbox accounts, you must add the individual mailbox security key for each account in the DNS management of your domain.
→ This requirement does not apply to family accounts. -
A mailbox account can be linked to multiple own domains.
-
It is possible to use a domain in both a business and a private customer account.
-
The secure sending address
@secure.mailbox.orgis not available for own domains. -
mailbox does not count aliases for the usernames
postmaster@,abuse@,hostmaster@, andwebmaster@.
→ However, these must be created before reaching the maximum number of aliases. -
Some DNS providers do not allow entries with the same priority.
→ In this case, use descending priorities like10,20, and30.
→mxext3.mailbox.org.must then have the lowest priority (30).
Troubleshooting 1 – Different DNS Settings at Your Provider
Example: Hetzner
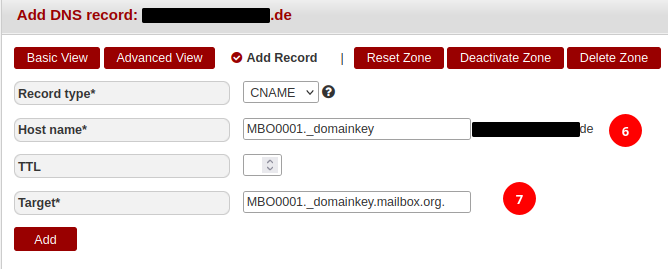
At the provider Hetzner, you need to enter the first part of the key including the domain name with a trailing dot into the field Hostname. The second part of the key is entered in the input field Target (see Figure 5).

Figure 4: DNS settings at Hetzner.
If you want to create the MX records from step 3, this is done in this dialog at Hetzner.
Here, enter the hostname under Hostname, the priority of the respective entry under Priority, and the MX servers from mailbox.org under Target.

Figure 5: MX entries at Hetzner.
Example: Inwx
This is what the dialog for DNS settings looks like at the provider Inwx.
The application uses Name and Value.
Inwx does not require the additional specification of the target domain. This also applies to all MX and CNAME records, as Inwx automatically appends the domain.

Figure 6: DNS entries at INWX.
Example: Netcup
In the input masks of the provider Netcup, for example, it is not necessary to specify the top-level domain.
Here you only need to enter the first part of the key, without example.com and without a trailing dot, into the input field Host.
As Destination, please enter the second part of the key.

Figure 7: DNS entries at Netcup.
Troubleshooting 2 – Query DNS Records via Command Line
Linux and macOS users can also use the dig command via the terminal. In the "ANSWER SECTION" of the command output, you will find the necessary information.
dig example.com mx
; <<>> DiG 9.11.3-1ubuntu1.13-Ubuntu <<>> example.com mx;; global options: +cmd;; Got answer:;; ->>HEADER<<- opcode: QUERY, status: NOERROR, id: 22604;; flags: qr rd ra; QUERY: 1, ANSWER: 3, AUTHORITY: 0, ADDITIONAL: 1;; OPT PSEUDOSECTION:; EDNS: version: 0, flags:; udp: 65494;; QUESTION SECTION:;example.com. IN MX;; ANSWER SECTION:example.com. 3600 IN MX 10 mxext1.mailbox.org.example.com. 3600 IN MX 10 mxext2.mailbox.org.example.com. 3600 IN MX 20 mxext3.mailbox.org.;; Query time: 67 msec;; SERVER: 127.0.0.53#53(127.0.0.53);; WHEN: Fri Aug 28 11:51:15 CEST 2020;; MSG SIZE rcvd: 118
Windows users can run this command in the command prompt (cmd.exe):
nslookup -querytype=MX example.com
Server: UnknownAddress: 192.168.179.1 Nicht autorisierende Antwort: example.com MX preference 10, mail exchanger mxext1.mailbox.org example.com MX preference 10, mail exchanger mxext2.mailbox.org example.com MX preference 20, mail exchanger mxext3.mailbox.org
Summary
In conclusion, it is important to correctly configure the DNS records when setting up email addresses with your own domain and to carefully follow the entire process. Make sure to properly insert the security keys into your domain's DNS settings and to set the correct MX and TXT records to ensure smooth usage of your email address. Regularly check whether the changes have been successfully applied, and follow the recommended best practices to improve your spam reputation and optimize email deliverability.
