The drive under Linux – how to set it up
Note: The features discussed in this article are available in all plans except the Light plan.
This guide explains how to set up the Drive on Linux (Ubuntu, Lubuntu, Mint) and synchronize it with a local directory.
This setup provides functionality similar to the native OX Drive client on Windows.
Why set up synchronization?
If you use a mobile device that is offline for an extended period, this method allows you to continue working without an internet connection.
Once the device reconnects to the internet, synchronization will occur automatically.
This gives you a duplicate of your files — one version stored online in your mailbox Drive and another stored locally.
Such redundancy can help prevent data loss.
Setting Up the Drive on Linux – Step by Step
To enable synchronization, you need two folders: one local and one online (the mailbox Drive).
In this example, the directories are:
/media/drivefor the online (mailbox) Drive/home/username/drive-local/for the local folder
This way, the Drive will appear in your file manager and can be accessed directly.
If you want to follow the Filesystem Hierarchy Standard (FHS) strictly, you can use a standard path like /mnt/drive.
However, this may appear less prominently in your file manager.
If you're unsure, just use the example path mentioned above.
Setting Up WebDAV Access on Linux (using davfs2)
Prerequisite: The following steps are performed in the Linux terminal. A text editor is also needed to edit system files.
Step 1: Understanding Important Terminal Commands
| Command | Description |
|---|---|
cd / | Changes to the root directory |
cd .. | Moves up one directory level |
cd /etc | Navigates directly to the /etc directory |
ls -lah | Lists all files (including hidden ones) with details like size and date |
mkdir /home/xxx/new_folder | Creates a new directory |
Tip: After typing a few letters of a directory name, you can press the Tab key to auto-complete the path.
Step 2: Prepare the fstab file
Navigate to the /etc directory:
cd /etc
Open the fstab file with a text editor (here using nano as an example):
sudo nano fstab
Add the following line at the end of the file:
davfs2
If davfs2 is not installed, install it via the software manager or by using the terminal:
| Distribution | Installation Command |
|---|---|
| Debian / Ubuntu | sudo apt install davfs2 |
| Fedora | sudo dnf install davfs2 |
| Arch Linux | sudo pacman -S davfs2 |
https://dav.mailbox.org/servlet/webdav.infostore/Userstore /media/drive davfs noauto,user,rw 0 0
Step 3: Check if davfs2 is installed
Open the software center or package manager of your Linux distribution (e.g. Synaptic, GNOME Software, Discover) and search for:
davfs2
If this library is not available, install it.

Figure 1: davfs2 configuration.
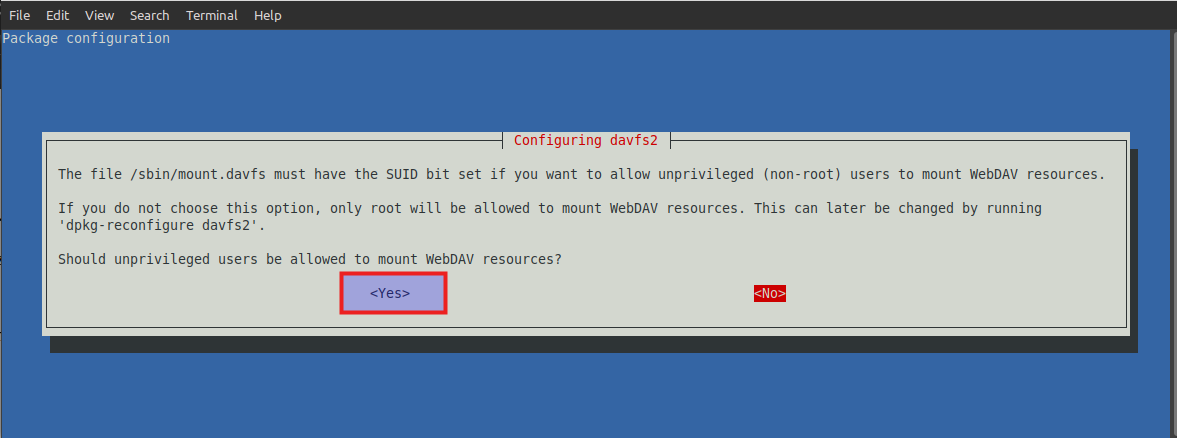
If davfs2 needs to be installed, the installer may ask whether to set the SUID bit. Please answer "no" or do not check the box. We will set this later.
Modify the configuration file /etc/davfs2/davfs2.conf
Navigate to the directory /etc/davfs2 and open the file davfs2.conf with a text editor in edit mode (e.g. using sudo nano davfs2.conf).
Adjust or add the following configuration parameters if they are not already present:
| Parameter | Value | Description |
|---|---|---|
if_match_bug | 1 | Enables compatibility mode for certain WebDAV servers. |
use_locks | 0 | Disables file locking to prevent access conflicts. |
cache_size | 1 | Sets the size of the local cache in MB. |
table_size | 4096 | Size of the internal file mapping table, suitable for many files. |
delay_upload | 1 | Enables delayed upload to improve performance when making changes. |
gui_optimize | 1 | Optimizes usage in desktop environments with graphical interfaces. |
buf_size | 64 | Sets the size of the local buffer in KB. |
Note:
Other configuration lines that you do not need or do not want to override should be commented out by placing a # at the beginning of the line.
This ensures that only the intended settings are active.
Store Username and Password Locally
Navigate to /etc/davfs2 and open the secrets file with a text editor in edit mode.
In the file /etc/davfs2/secrets, add the following line:
/media/drive mailboxname@mailbox.org password
Replace mailboxname@mailbox.org and password with your actual mailbox login credentials.
If your password contains special characters or spaces, it is recommended to enclose it in double quotes to prevent misinterpretation.
To protect the file from unauthorized reading, set the correct permissions by entering the following command in a terminal:
sudo chmod 600 /etc/davfs2/secrets
Create and Automatically Mount the WebDAV Directory at Linux Startup
Create the folder /media/drive using the following command:
sudo mkdir /media/drive
Now assign ownership permissions to this folder. Replace xxx with your actual username.
If you're unsure of your username, you can find it with the command:
whoami
Here is the command to set the correct permissions:
sudo chown -Rv xxx:xxx /media/drive
You can now perform an initial test:
sudo mount -t davfs https://dav.mailbox.org/servlet/webdav.infostore/Userstore /media/drive
If this command executes without errors, your mailbox Drive is now available locally on your computer.
To automatically mount the folder — that is, to connect it on every system restart — you need to add the mount command to your startup settings.
In Ubuntu, for example, you can add the following command under LXQT Session Settings → Autostart:
mount /media/drive
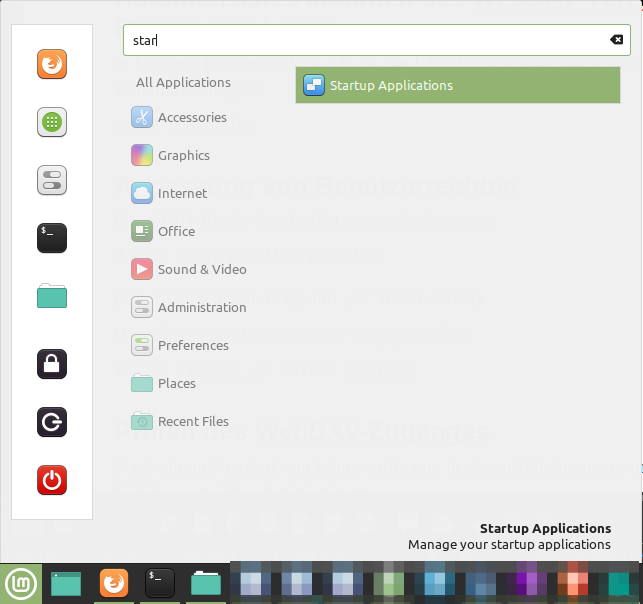
In Linux Mint Cinnamon, this can be added in the Startup Applications settings.
Adjusting User Permissions
Here you allow the unprivileged user, with whom you usually work, to mount the drive.
Set the SUID bit for the mount.davfs command:
sudo dpkg-reconfigure davfs2
(or on other distributions: sudo chmod u+s)
Note: Answer the corresponding question with "Yes".

Figure 2: Linux Mint Cinnamon.
Add the user to the davfs2 group:
sudo usermod -aG davfs2 username
Replace username with the actual username you log in with. If you do not know it, find it out by running:
whoami
Checking WebDAV Access
After rebooting Linux, the mailbox Drive should be accessible in a file manager under /media/drive. It may also be shown as a drive on the desktop (see left part of the screenshot).
Synchronization with a Local Directory
Creating a Local Directory
Create a local directory. Replace xxx with your login username. If you are unsure, use the whoami command.
An example path might be:
mkdir /home/xxx/drive-local
Inside /media/drive/ you will find a directory with the mailbox-registered username, e.g. "Max Mustermann". Copy the contents of this directory to /home/xxx/drive-local/.
Synchronization Using FreeFileSync
Users have recommended FreeFileSync as one of the best open-source programs for synchronizing two directories. If one is a network directory, synchronization to a local directory can be easily set up.
The program can be downloaded from https://freefilesync.org/ and unpacked into a directory, e.g. /home/xxx/Programs/FreeFileSync. Replace xxx with your username.
Note:
Extract .tar.gz files using the terminal command:
tar -xzvf FreeFileSync_XX.X.tar.gz
Usually, extraction can also be done via the file manager by double-clicking the file.
The program can then be started via the executable:
/home/xxx/Programs/FreeFileSync/FreeFileSync
(Possibly you may need to install the libgtk2.0 library.)
In the FreeFileSync window, specify the two directories to synchronize at the top. In our example (see screenshot point 1):
/media/drive/Max Mustermann
and (point 2):
/home/xxx/drive-local
Use the green gear icon at the top right (point 3) to configure synchronization details.
Click the green arrow icon (point 4) to start synchronization.
In the next step, you will see the pending tasks. If they seem plausible, you can confirm the synchronization.
Automatic Synchronization with RealTimeSync
When installing FreeFileSync, the separate program RealTimeSync is also included.
RealTimeSync can automatically perform synchronization in the background. It monitors both directories and starts synchronization whenever it detects a change.
To set up RealTimeSync, you need a batch file that contains the synchronization tasks.
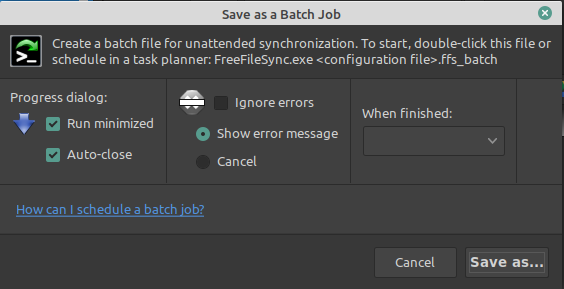
You create this by selecting “File – Save as Batch Job” in FreeFileSync. Keep the default settings.

Figure 4: Automatic Synchronization with RealTimeSync.
By default, the batch file is named BatchRun.ffs_batch and in this example, it should be saved in /home/xxx/Programs/FreeFileSync.
Now start the RealTimeSync program.
It can be started via the executable:
/home/xxx/Programs/FreeFileSync/RealTimeSync
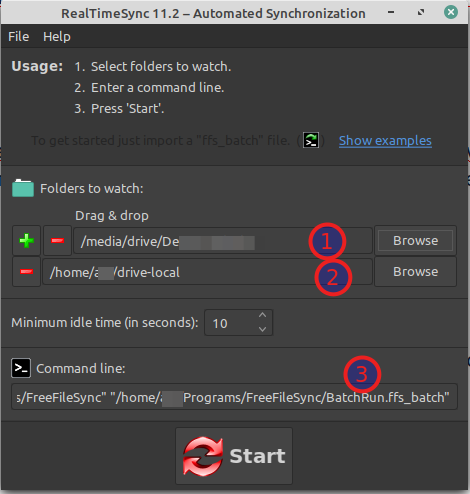
In RealTimeSync, specify the two directories to synchronize again (points 1 and 2 in the screenshot).
For the command line to execute (point 3 in the screenshot), enter:
/home/xxx/Programs/FreeFileSync/FreeFileSync /home/xxx/Programs/FreeFileSync/BatchRun.ffs

Figure 5: Automatic Synchronization with RealTimeSync.
RealTimeSync indicates it is active with two red arrows in the taskbar.
Whenever synchronization starts, two green arrows appear, which disappear once synchronization finishes.
From now on, you can always save data in the local directory:
/home/xxx/drive-local/
RealTimeSync will then synchronize with the mailbox Drive.
Note: Limitations of RealTimeSync
RealTimeSync allows you to specify how long to wait after detecting a change before starting synchronization ("minimum quiet time").
During synchronization, directory monitoring is temporarily suspended.
If file operations occur during this time, they will not be detected immediately.
However, synchronization of these files will be caught up during the next automatic or manual synchronization.
Run FreeFileSync Automatically at System Startup
Lubuntu (LXQt)
In Lubuntu, the automatic start of FreeFileSync can be set up via the LXQt Session Settings:
- Open the Session Settings (
lxqt-config-session). - Go to the Autostart tab.
- Add the following command:
/home/xxx/Programs/FreeFileSync/RealTimeSync" "/home/xxx/Programs/FreeFileSync/BatchRun.ffs

Figure 6: Automatic start of FreeFileSync.

Figure 7: Automatic start of FreeFileSync.
Done!
Now you can test by copying files into the directory to be updated on your computer. In our example: /home/xxx/drive-local/.
Check if the added files then appear under /media/drive/.
Please note that syncing very large files over a slow internet connection (especially upload) can slow down the system.
Enjoy using mailbox Drive on Linux!
