Using e-mails with a custom domain
These instructions are intended for our private customers only. If you have a Business account, please follow the instructions in this article: mailbox Business - getting started.
You can also send and receive emails from your custom domain (e.g., firstname.lastname@example-domain.com) via our servers. To do this, add your email address as an external alias in the mailbox-Suite. Once configured, you can also set this alias as your primary address.
Requirements
- Plan:
- Individual private customer account: Standard or Premium plan
- Members of a family account: Light, Standard, or Premium plan
- Your custom domain with a provider of your choice (e.g., Hetzner, Netcup, INWX)
- Access to your custom domain administration: Your provider or host will grant you with access to your custom domain administration.
Quick guide
When configuring an external alias, follow the steps below in the order specified to ensure a smooth process. Click on a step to access detailed instructions.
Step 1: Retrieve mailbox security key
All settings > Email addresses menu item > Email aliases section > Add external alias > Save > Note the mailbox security key
Step 2: Verify your custom domain
Store the mailbox key in the DNS settings of your domain provider:
- Host name: Subdomain (1st part of the mailbox security key) (Spelling may vary depending on the provider)
- Target: Value (2nd part of the mailbox security key)
- Record type: TXT
Step 3: Enter your email address as an alias in mailbox
All settings > Email addresses menu item > Email aliases section > Add external alias > Save
Step 4: Set up forwarding to mailbox
Enter MX records in the DNS settings of your domain provider:
| Domain | Type | Priority | Target server |
|---|---|---|---|
| example-domain.com | MX | 10 | mxext1.mailbox.org. |
| example-domain.com | MX | 10 | mxext2.mailbox.org. |
| example-domain.com | MX | 20 | mxext3.mailbox.org. |
Related topics
Query DNS records via the command line
How can I use my custom domains/email addresses?
- You can link your mailbox account to multiple custom domains.
- The secure sending address
@secure.mailbox.orgis not available for your custom domains. - The number of available aliases is limited (depending on the selected plan).
mailbox does not count aliases for the following user names:
postmaster@,abuse@,hostmaster@, andwebmaster@. - Administrators of family accounts have two configuration options:
- All family members can use their own domain and create aliases for it.
- Only the administrator of the family account can use their own domain and create aliases for it.
Emails from custom domains that are redirected and sent via mailbox are processed and stored on our servers.
Step 1: Retrieve the mailbox security key
Use the mailbox security key to verify that you are the legitimate owner of the external domain.
To retrieve the mailbox security key:
- Click on the gear icon in the upper right corner of the mailbox-Suite and select the All settings menu item.
- In the settings, select the Email addresses menu item.
- Open the Email aliases section.
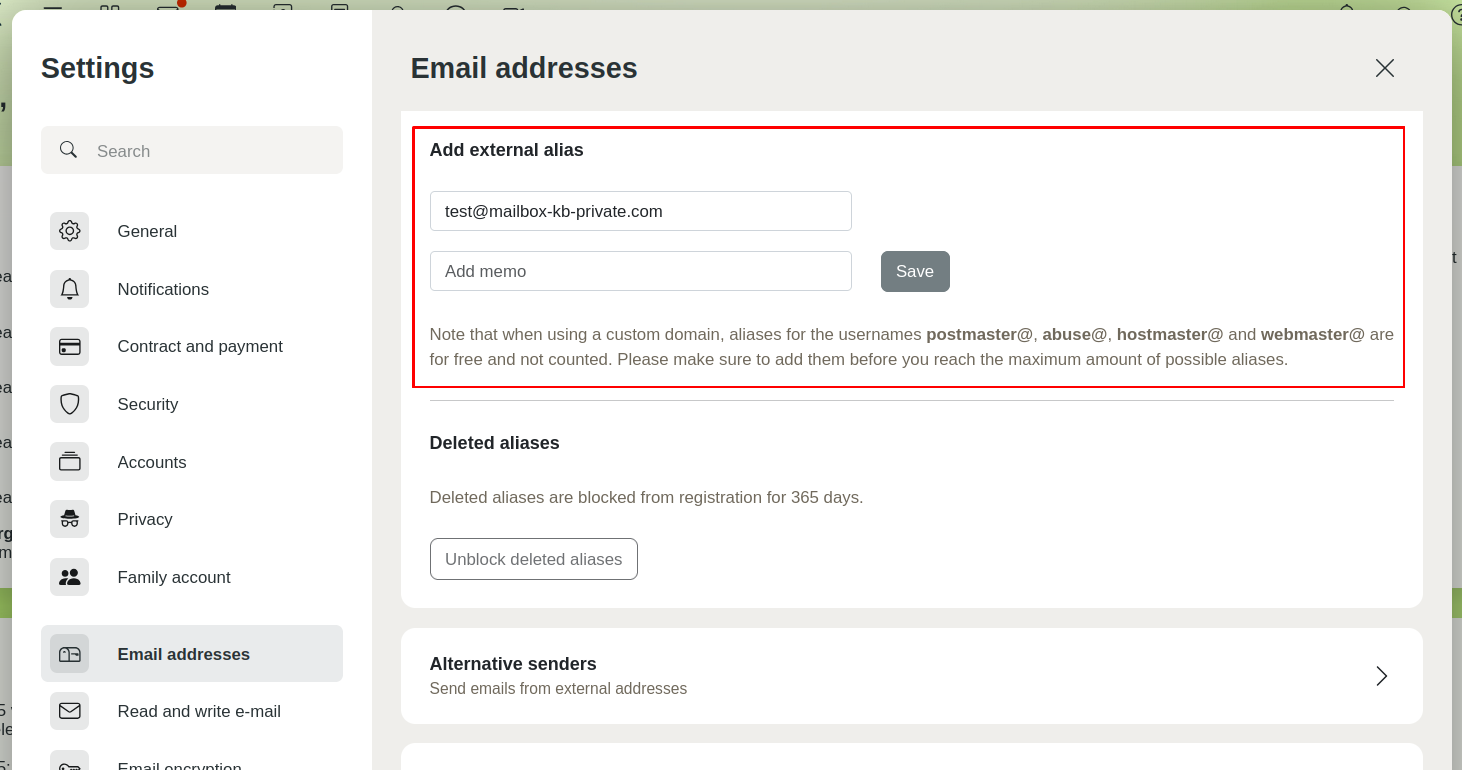
- Under Add external alias, enter the desired email address of your custom domain, e.g.,
firstname.lastname@example-domain.com. - Click Save.

Add external alias in mailbox
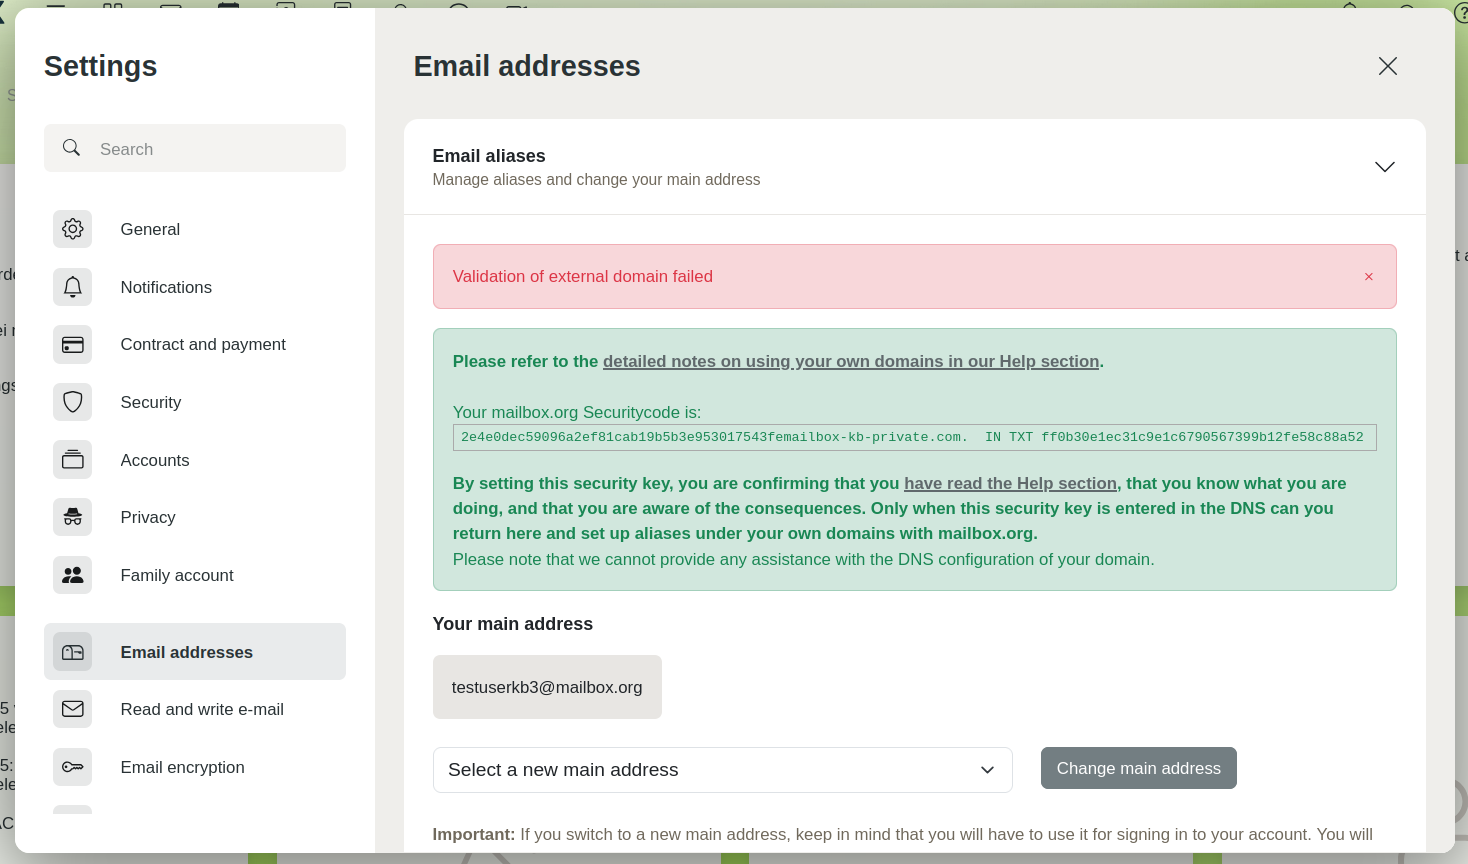
mailbox now checks in the background whether the mailbox security key is already stored in the DNS settings of your domain. If you are storing the external alias in mailbox for the first time, this validation will fail and a corresponding message will appear. This message contains the mailbox security key, which you will store with your provider in the next step.

mailbox security key validation
If you want to use your custom domain for multiple mailbox accounts, you have to generate an individual mailbox security keys for each account (this only applies to individual accounts, not to members of a family account).
Specifics for family accounts
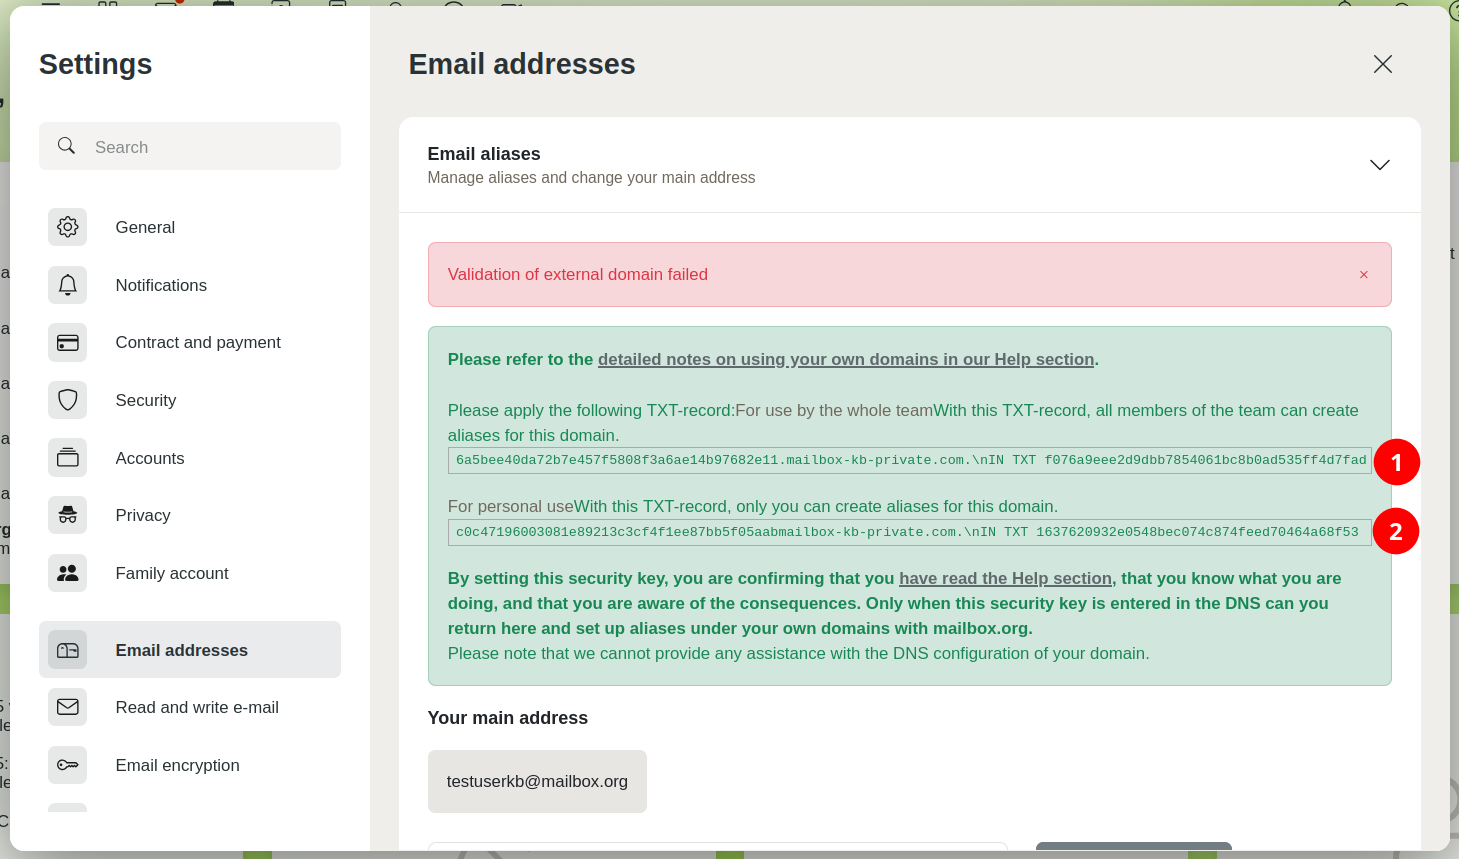
If you are the administrator of a family account, you will see two entries. Select the appropriate entry according to your desired use of the domain:
- Entry (1): All family members can create aliases for their own domain.
- Entry (2): Only the administrator of the family account can create aliases for their own domain.

Security key for validating the external domain with a family account
Step 2: Verify your custom domain
Set the mailbox security key in the DNS settings of your domain provider to verify your custom domain.
The requirements for the format of the security key may vary depending on the domain provider. mailbox can therefore only give general recommendations. If you need assistance configuring your DNS records, please contact your provider's support team.
-
Log in to your provider's domain management.
-
Open the DNS settings and add a new record. Make sure to copy the entire key or parts of it correctly.
Host name: 1st part of the mailbox security key, e.g.,
p30oe995fc9105322345b6277ac3b1i2eb45106j5j7.example.com.(with a period at the end)p30oe995fc9105322345b6277ac3b1i2eb45106j5j7.example.com(without the trailing period)p30oe995fc9105322345b6277ac3b1i2eb45106j5j7(only the first part without period and domain) (Spelling may vary depending on provider)Record type:
TXTTarget: 2nd part of the mailbox security key, e.g.
IN TXT 5ahgui6nsdj5kkk666l333m7m7k7n5k6nnnn5bb4 -
Save your changes.
For technical reasons, synchronization of the DNS records may take up to 48 hours. Once synchronization is complete, a message will appear in mailbox Suite and you can use your email address as an external alias.
If you want to use your domain for multiple mailbox accounts, you have to enter the individual mailbox security keys for each account in the DNS settings (applies only to individual accounts, not to members of a family account).
Step 3: Enter your email address as an alias in mailbox
To enter your email address as an alias in mailbox:
- Click on the gear icon in the upper right corner of the mailbox-Suite and select the All settings menu item.
- Select the Email addresses menu item in the settings.
- Open the Email aliases section.
- Under Add external alias, enter the desired email address of your custom domain, e.g.,
firstname.lastname@example-domain.com. - Click Save.

Add external alias to mailbox
mailbox will now check in the background whether the mailbox security key is correctly stored in your custom domain's DNS records. Once validation is complete, you will receive a message confirming this.
Step 4: Set up forwarding to mailbox
To ensure that emails to your custom domain are forwarded correctly to the mailbox server, enter the mailbox MX records in your provider's DNS records. These MX records (mail exchange records) contain the addresses of the mail servers responsible for receiving emails for your custom domain.
-
Log in to your provider's domain administration.
-
Open the DNS settings and enter all 3 of the following MX records one after the other. Please note the spelling required by your provider.
NoteSome domain providers do not allow records with the same priority. In this case, use the priorities
10,20, and30, where30is the lowest priority.Domain Type Priority Destination server example-domain.com MX 10 mxext1.mailbox.org. example-domain.com MX 10 mxext2.mailbox.org. example-domain.com MX 20 mxext3.mailbox.org. - Name of your custom domain: Usually Host or Host name in the DNS settings. Replace
example-domain.comwith your custom domain. - Forwarding priority: Mail servers with the value
10are addressed first; the mail servermxext3.mailbox.org.with the value20serves as a fallback. - Destination server: Usually Destination or Points to in the DNS settings. Enter all 3 mailbox inbox servers with the listed priorities to ensure that emails continue to be delivered reliably via mailbox even in the event of a server failure.
- Name of your custom domain: Usually Host or Host name in the DNS settings. Replace
-
Save your changes.
-
Check whether your DNS records contain MX records that do not point to the mailbox servers. Remove these records.
For technical reasons, the synchronization of DNS records can take up to 48 hours. Until this process is complete, emails may still be received in your previous mailbox. Therefore, please check your old mailbox.
Once synchronization is complete, mailbox will receive all emails from your custom domain.
To optimize the deliverability of your emails, add additional DNS records (SPF, DKIM, DMARC). This will help you avoid emails from your domain being classified as spam or rejected. You can find best practices for this in the article How to improve spam reputation and avoid bounces.
Example configurations for different domain providers
Example: Hetzner
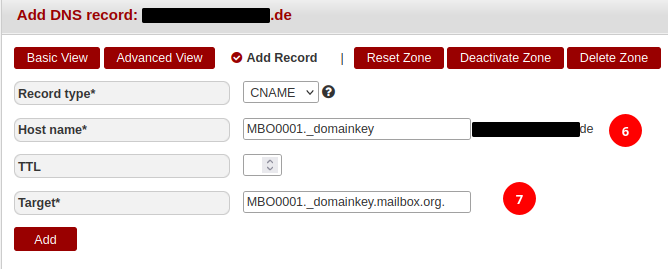
For the provider Hetzner, enter the first part of the key in the Host name field, including the domain name with a period at the end. Enter the second part of the key in the Target field.

DNS settings at Hetzner
The MX records are created at Hetzner in the following dialog:

MX records at Hetzner
Here, enter the host name under Host name, the priority of the respective record under Priority, and the MX servers of mailbox under Target.
Example: INWX
In the dialog for the DNS settings at the provider INWX, the application refers to Name and Value. INWX does not require the additional specification of the target domain. This also applies to all MX and CNAME records, as INWX automatically adds the domain.

DNS records at INWX
Example: Netcup
In the input masks of the provider Netcup, it is not necessary to specify the top-level domain.
Here, you only need to enter the first part of the key in the Host input field, without example-domain.com and without a trailing period.
Enter the second part of the key as the Destination:

DNS records at Netcup
Querying DNS records via the command line (advanced)
You can query the configuration of your DNS records directly via the command line.
Linux/macOS
Command: dig example-domain.com MX
Windows
Command: nslookup -type=MX example-domain.com
Troubleshooting
My emails are being rejected
Error: Emails to my domain are being rejected as undeliverable (“User unknown”).
Possible causes:
- Your domain's email address is not stored or is incorrectly stored as an external alias in mailbox.
- The email address of your domain is classified as untrustworthy.
Solution:
- Check whether your email address is correctly stored in mailbox as an external alias (see Step 1).
- Add DNS records for email authentication (SPF, DKIM, and DMARC) (see article How to improve spam reputation and avoid bounces).
