IP-Whitelisting
IP whitelisting for mailbox business customers
IP whitelisting allows business customers of mailbox to restrict access to their managed mail accounts so that only connections from predefined networks are permitted.
Any access attempt originating outside of these specified network ranges will be strictly blocked.
This enables a configuration in which secure access to mail accounts is possible exclusively via the company network.
For use outside these networks, a VPN connection is therefore required.
IP whitelisting thus provides an additional layer of security against unauthorized access.
The setup is simple and can be configured within a few minutes.
Details at a glance
- Access to mail accounts is only possible from predefined networks
- Restrictions apply to login via the website and access to IMAP servers (for example, via Outlook or other mail clients)
- Maximum flexibility through individual configuration of each mailbox
- Multiple IP address entries can be added as a comma-separated list
- Compatible with IPv4 and IPv6 standards
Exceptions to IP whitelisting
- IP addresses that belong to the private address range (for example 192.168.2.1 or 172.0.0.1).
More information about private networks on Wikipedia - Access to CalDAV, CardDAV, and WebDAV remains possible even outside the defined networks.
Configure IP whitelisting in the mailbox
To define a network or a list of networks for a mailbox, follow these simple steps:
- Log in to your Console at setup.mailbox.org.
- Click on the domain whose mailboxes you want to configure.
- Click the Edit button (1) for the mail address you want to configure, or create a new mailbox.
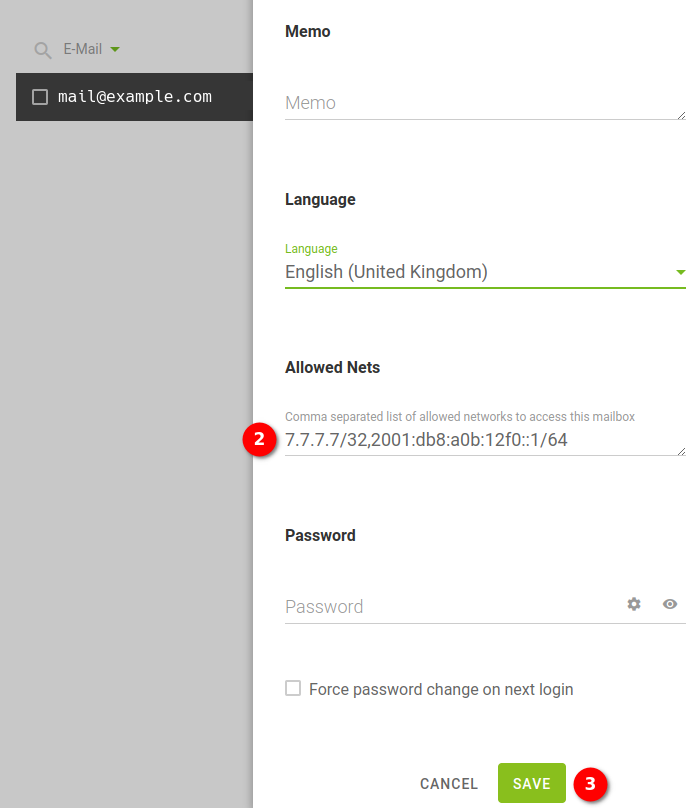
- In the menu that opens on the right, scroll down and enter one or more IP addresses in the Allowed networks (2) field as a comma-separated list.
- Confirm your entries by clicking Save (3).
That’s it.
Access to this mailbox is now only possible from the specified networks.
Repeat the process for any other mailbox as needed.

Figure 1: Open the edit menu using the edit button.

Figure 2: Enter the desired IP addresses and save your input.
