Find appointments and create surveys with Polls
Screenshots (to be added)
Note: The screenshots for this article will be provided shortly. All placeholders and figure captions (e.g., “Figure 1–5”) will be filled as soon as the final assets are available. The instructions remain valid and can be followed without the images.
Find an Appointment with Polls
With Polls you have the option to find a common appointment by providing possible dates to choose from.
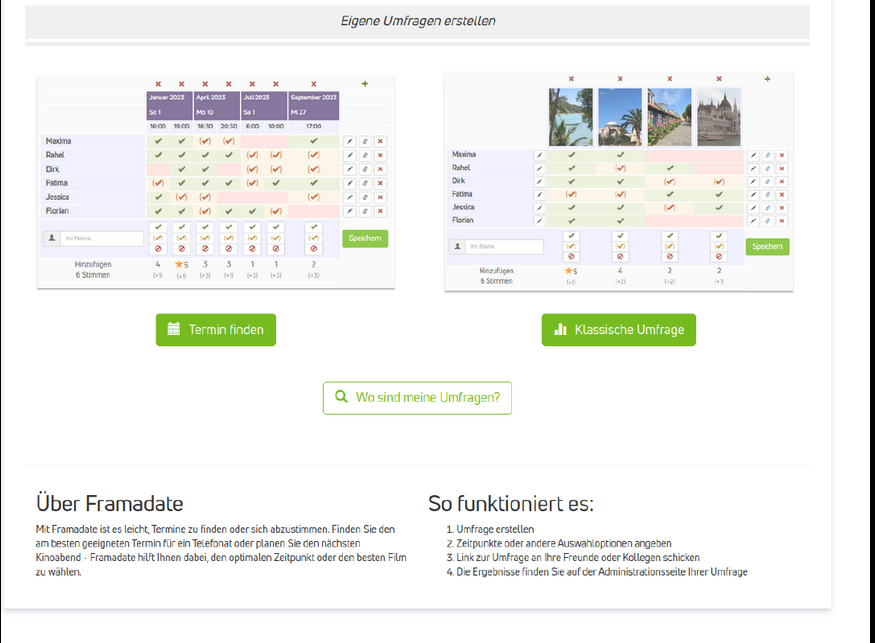
Figure 1: Choose between finding an appointment or creating a survey.
Survey Details and Additional Settings
In the first step, enter the following information:
- Your name
- Your email address
- The title of the survey
- Optional: a description
Below the input fields you will find additional Optional Settings.
Here you can:
- Limit the number of votes per option
- Adjust the link if needed
- Protect the survey with a password
- Configure permissions for subsequent changes
- Set the interval for notifications about new votes and comments
- Restrict access to the survey results to the author
Confirm your entries with the button Continue to step 2.
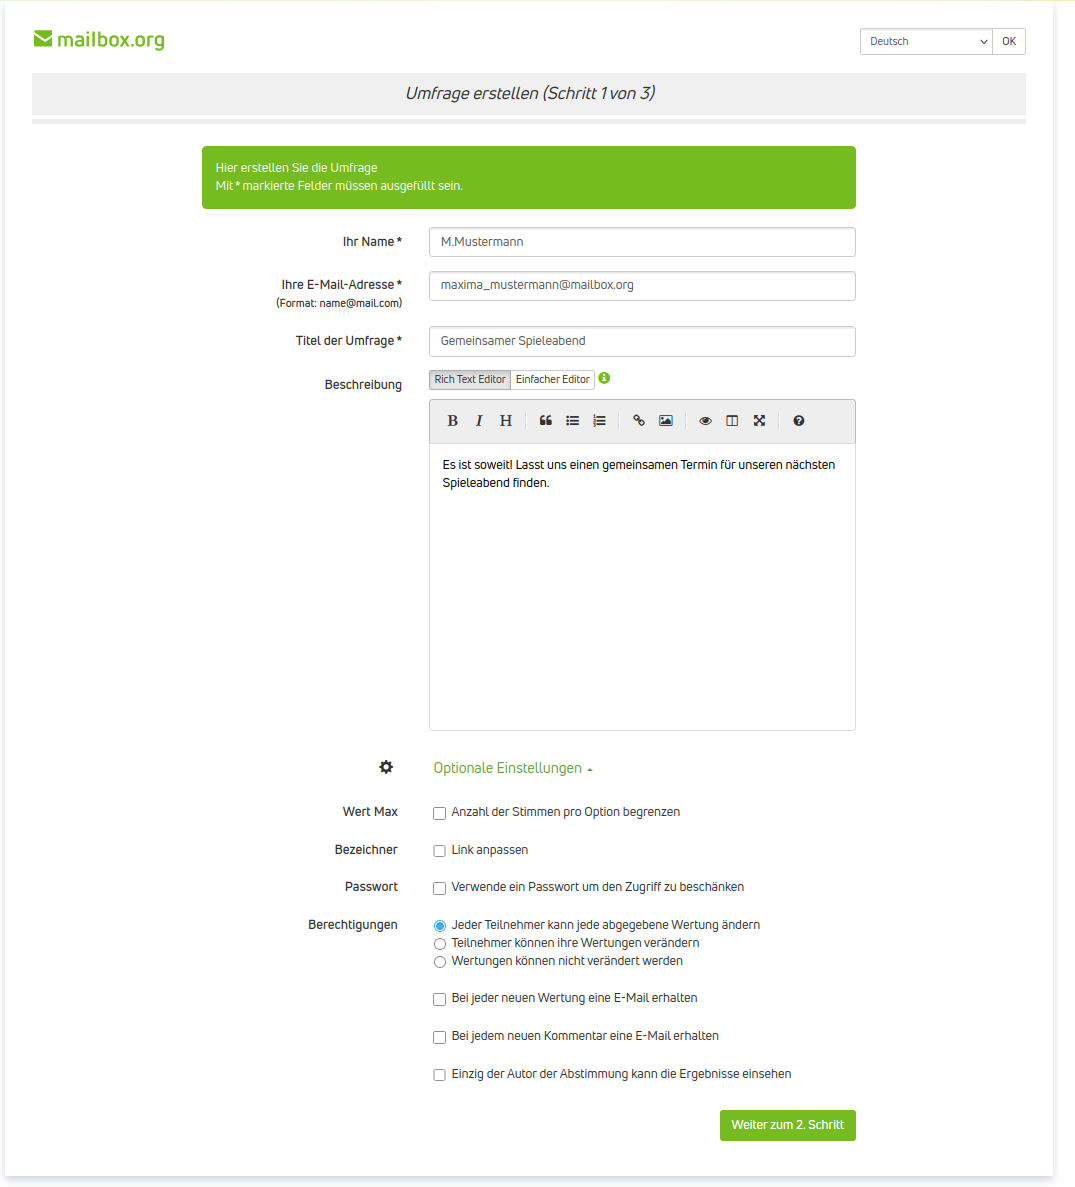
Figure 2: Create a survey according to your requirements.
Explanation of the Fields
| Field | Explanation |
|---|---|
| Your name | Enter your name here so participants know who created the survey. |
| Your email address | Enter your email address to assign the survey and, if necessary, send notifications. |
| Title of the survey | Assign a title to the survey, e.g., “Game Night”. |
| Description | Optionally add a description to provide further information or instructions. |
| Optional settings | In this section you will find additional configuration options for the survey. |
| Limit number of votes per option | Define how many votes may be submitted per option. |
| Adjust link | You can customize the automatically generated link for the survey. |
| Password | Protect the survey with a password to prevent unauthorized access. |
| Permissions | Define whether and how participants may change their submitted votes. |
| Notifications for new votes | Enable email notifications when a new vote is submitted. |
| Notifications for new comments | Enable email notifications when a new comment is posted. |
| Restrict access to results | You can define that only the survey author may view the results. |
| Continue to step 2 | Use this button to proceed to the next step of survey creation. |
Configure Appointment Suggestions
In the next section, you can specify the dates that should be published with the survey.
- Select the desired date and time(s) for the appointment suggestions.
- Add or remove additional fields for times as needed.
- Add or remove additional fields for dates as needed.
When you are finished, click Continue to move on to the next step.
Voting Period and Publication
In the final step, you will receive a summary of your appointments and the option to define the day of archiving. Afterwards, you can create the survey.
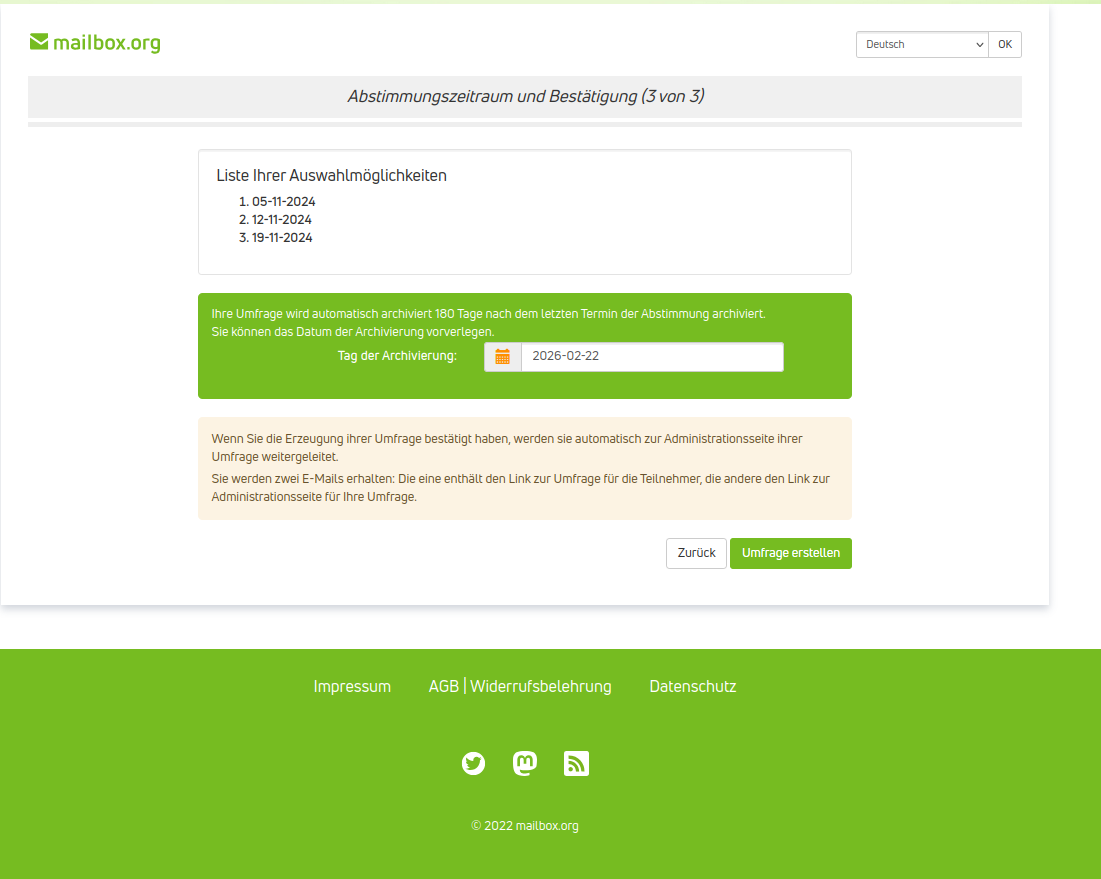
Figure 3: Check your entries, optionally set an archive date, or publish the survey.
Share, Export and Edit the Survey Afterwards
The survey is now published and you gain access to the administration page. Here you can also adjust settings afterwards and view the votes.
If you want to share the survey, you have two options (see Figure 4):
- Share the public link to allow others to participate.
- Share the link to the administration page of the survey. Please note that this link also grants access to the survey settings. Only share this link if you want to allow others to manage the survey.
On the administration page you also have the option to export the survey results as a print version or CSV file. You may also delete the survey here if required.
Of course, you can also cast your own vote and thus participate in the poll yourself (see Figure 4).
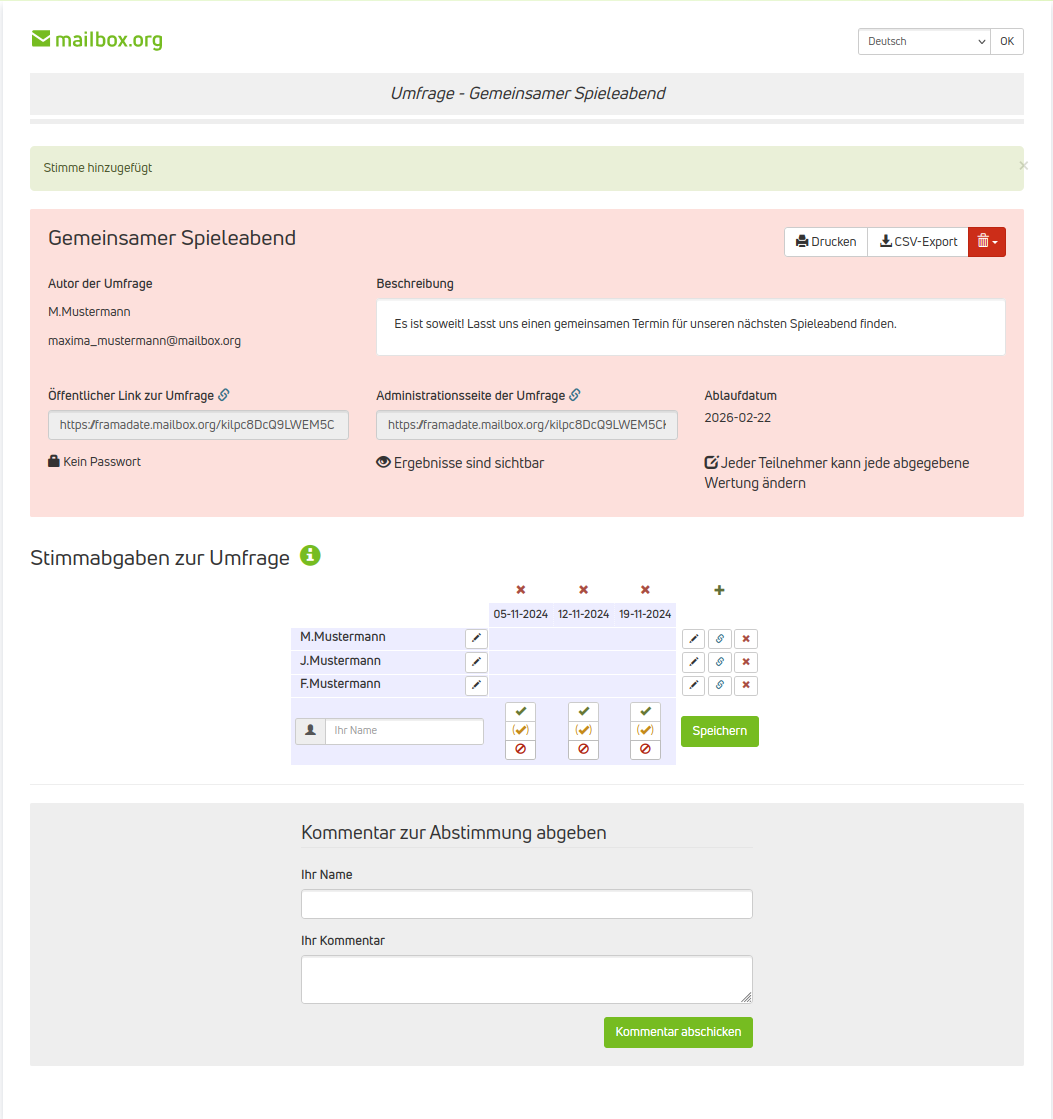
Figure 4: The administration page. Adjust settings afterwards, share links to the survey, and participate yourself.
Survey and Evaluation
Participation in the Survey
Participation in the survey is simple and straightforward.
Enter your name in the free field and select the parameters that apply to you from the listed appointment suggestions. Here you can choose between the following options:
- Vote with Yes.
- Vote with Yes, under reservation.
- Vote with No.
Participation in the survey and publishing your selection is completed by saving your entries.

Figure 5: Participation in the survey is simple and offers you the three main options to effectively reflect appointment planning.
Evaluation of the Survey
The survey results are displayed either directly in the participation area or below in a graphic diagram.
The best option is summarized in a text field, stating the date and the number of votes submitted.
As the survey administrator you will also receive an email notification for each successful participation, depending on your configuration.
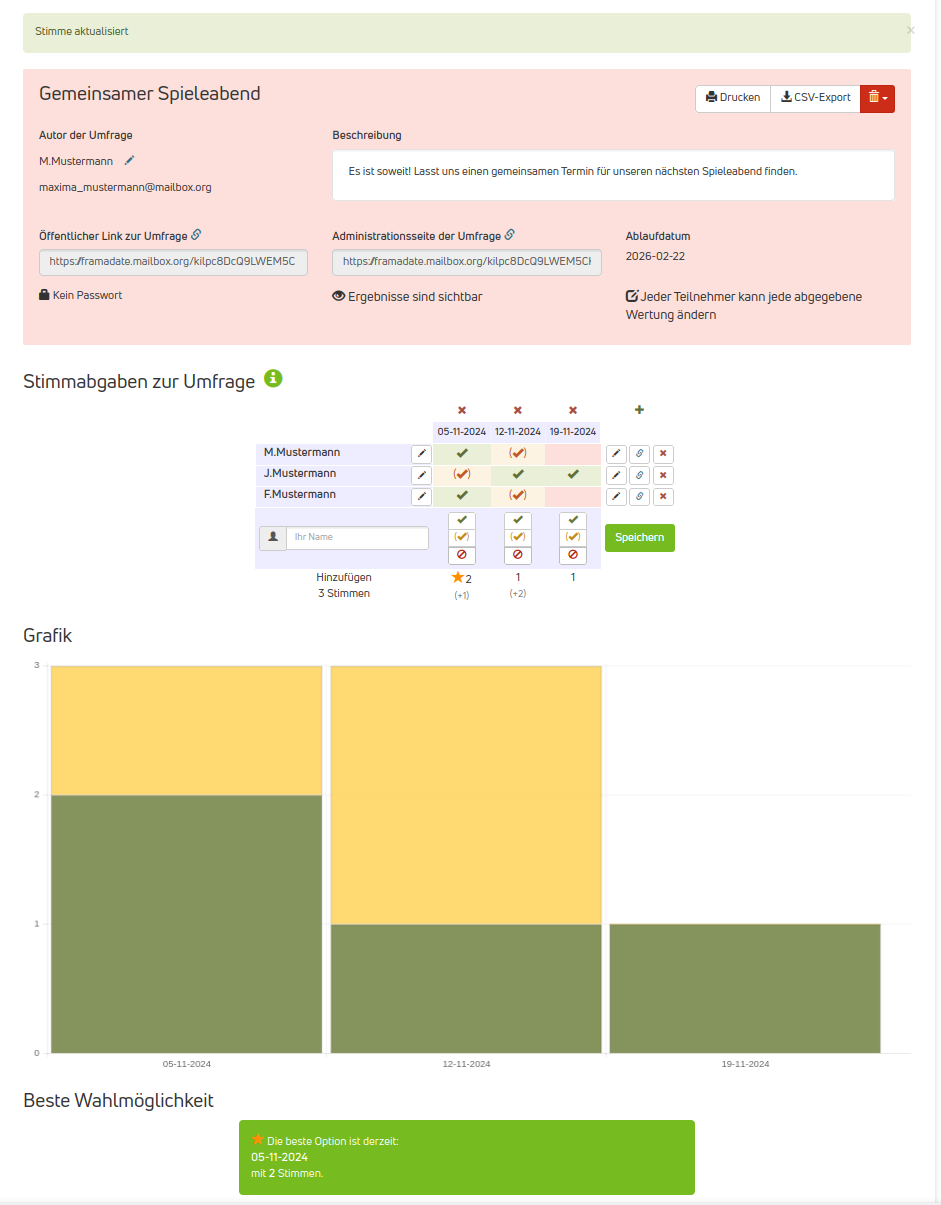
Figure 5: The survey results are displayed in different ways.
